Chemical Composition, Anti-nutritional Factors and Shelf-Life of Oyster Mushroom (Pleurotus Ostreatus)
Some saprophytic fungi produce spore-forming umbrella-shaped edible fructifications called mushrooms. Various types of mushrooms are eaten in many parts of the world while some others, more commonly referred to as toadstools are poisonous (or even deadly poisonous), indigestible and unpleasant in taste. The problems of indigestibility and unpleasant taste have been linked to high levels of anti-nutritional factors in those fungi. Edible mushrooms are highly palatable and nutritious, containing 21-49% protein (dry basis) and are richer in vitamins B1, B2, B12 and C and minerals than most cereals and vegetables. In terms of protein content, they therefore compare favourably with legumes, many of which contain 20-40% protein. Mushrooms also contain an array of anti-nutritional factors. These toxic components generally include tannins, oxalates, phytic acid, hydrocyanic acid and alkaloids.
The oyster mushroom (Pleurotus ostreatus), locally called linaba (Ibibio in Nigeria) is a popular mushroom that is widely consumed in the rainforest zone of West Africa. In Nigeria, oyster mushroom, together with field mushroom, Agaricus compestris called mkpifia (Ibibio in Nigeria) were a primary source of protein for the mal-nourished and hungry populations in some parts of the Biafran Enclave during the 30 - month (1967-1970) Nigerian Civil War. The mushroom is currently obtained principally from the wild, where women and children collect them since it is not cultivated. Supply is highly seasonal and a glut usually occurs in the peak period (April - June), resulting in enormous losses due to improper post-harvest handling. In Nigeria, large quantities of this mushroom are harvested and presented in open trays (unpackaged) for sale to motorists by rural dwellers along many public highways.
Scientific information on Nigerian mushrooms is scarce. Most of the reports of Nigerian wild mushrooms in the literature are descriptive but a few reports on their nutritive values and toxicity have emerged. None of the latter, however, cover the oyster mushroom, P. ostreatus. This study was therefore designed to evaluate the chemical composition, toxicity, and storage life of this popular tropical mushroom.
MATERIAL AND METHODS
Sample collection, handling and analysis : Oyster mushroom samples were harvested from dead mango tree stumps in a garden at the day-old (button) and full-grown stages. In the laboratory, the mushrooms were cleaned, and each of the batches was divided into two sub-batches. One of each sub-batch was dried at 60°C to a constant weight. The dried (whole) samples were blended using a Kenwood blender and stored at ambient temperature in clean plastic containers until analysed. They were evaluated (within 3 days) for moisture content, crude protein, ether extract, crude fibre and ash according to AOAC (1980). Nitrogen-free extract (NFE) was determined from the formula :
% NFE = 100 - (% crude protein + % crude fibre + % ether extract + % ash + % moisture content)
The Atwater factors were used in calculating energy content. Anti-nutritional factors (phytic acid, tannins, oxalates and hydrocyanic acid) were determined using standard methods. The phyto-chemical substances were determined in both raw and boiled (100°C for 10 min) samples.
Storage: The remaining sub-batch of the full-grown stage mushrooms was further sub-divided into four subgroups. Each sub-group was weighed using a Mettler balance. The sub-groups (270 g each) were then randomly allotted to storage according to the following experimental plan :
(i) Storage without packaging at room temperature. (ii) Storage in perforated (12 perforations of 4 mm in diameter each) low-density polyethylene (20-mm thick) bags at room temperature. (iii) Cool storage without packaging. (iv) Cool storage in perforated low density polyethylene bags in the evapourator coolant structure (ECS).
Cool storage was carried out using a locally constructed low-external input, simple and cheap cooling system, the ECS developed by the Nigerian Institute of Stored Products Research, Ibadan, Nigeria. The cooling structure consists of two burnt clay pots, placed one inside the other. The space between the pots was filled with river bed sand and always kept wet which provides the cooling medium while the space inside the inner (smaller) pot provides the storage chamber. The top is covered with a slab made of the same material (clay) as the pots. Cooling takes place because of heat transfer from the produce (mushroom), in the storage chamber to the wet river bed sand (the cooling medium), from where the heat is further transferred to the outer surface, and eventually dissipated with the evapourating water. The system does not require electric power.
During storage, room temperature was 28±2°C while the evaporator coolant storage chamber temperature was 15±3°C. Weight changes were monitored daily. Samples were taken at the same interval for sensory (quality) evaluation and overall acceptance by a 10-member taste panel, using the 9-point Hedonic scale, ranging from 1 = dislike extremely to 9 = like extremely. Samples were prepared for evaluation by heating the mushrooms in boiling water for 15 min.
Statistical analysis : Data generated were subjected to analysis of variance. Means were separated using the LSD.
RESULTS AND DISCUSSION
Data given in Table 1 show the proximate composition of P. ostreatusn at the button and full grown stages. Table 1 also indicates the content of some major minerals in the mushroom. The full grown mushroom contained a significantly higher (P [ 0.05) level of protein than in the button stage. This observation agrees with Motskus. This author had previously reported that the chemical composition of mushrooms is markedly affected by the stage of growth, and that the mature mushroom is normally richer in protein. The results indicate that from the protein supply viewpoint, and to a large extent, the mineral supplysituation also (Table 1), it is more beneficial to harvest P. ostreatus at the mature flat stage than at the button stage. The results of the present study, however, largely contradict those of Chang who found the young fruit body of Volvariella volvacea to be the most nutritive stage of this mushroom. Kurkela had reported that mushrooms vary in their chemical compositions, and this may account for the observed differences between the present study and the earlier report of Chang. Maw has reported that the part of the
Table 1
Proximate and Mineral Composition of Oyster Mushroom at Two Growth Stages (% Mean Values ± S.E.)
| Component |
Button |
Full grown |
| Crude protein |
28.00±2.0a |
40.25±3.7b |
| Ether extract |
1.90±1.0 |
1.50±2.0 |
| Crude fibre |
7.00±4.0 |
7.40+1.4 |
| Ash |
6.20±4.0 |
6.80±4.0 |
| Moisture |
90.80±6.0 |
90.00±2.2 |
| Nitrogen-free extract |
36.33±1.7a |
46.55±2.0b |
| Energy (kcal/100g) |
412.44 |
686.52 |
| Calcium |
0.015 |
0.018 |
| Magnesium |
0.033a |
0.996b |
| Copper |
0.055a |
0.113b |
| Iron |
0.155a |
0.121b |
| Zinc |
0.278a |
0.221b |
| Phosphorus |
0.251a |
0.222b |
Values are the means of triplicate determinations. Means within the same row carrying different superscripts are significantly different (P [ 0.05)
Table 2
Levels of Anti-Nutritional Factors in Raw and Boiled Pleurotus Ostreatus (MG/100G)
| Factor |
Raw |
Boiled |
| Hydrocyanic acid |
1.16a |
0.16b |
| Total oxalate |
5.04a |
2.40b |
| Phytic acid |
42.24a |
14.08b |
| Tannins |
10.20a |
4.80b |
Values are the means of three determinations. Row means are significant (P [ 0.05).
Mushroom sampled also affects their chemical composition.
Results in Table 2 show the levels of some important phyto-chemicals (anti-nutritional factors) in P. ostreatus. The effects of heat treatment on these substances are also indicated. Heat treatment (boiling) generally brought about significant reductions (P [ 0.05) in the levels of anti-nutritional substances.
Changes in sensory evaluation of P. ostreatus during storage are shown in Table 3. The results indicate significant effects (P [ 0.05) of mode and duration of storage on the flavour, tenderness, colour and overall acceptance of the mushrooms. Overall acceptance showed strong positive correlations with the sensory parameters evaluated with R values of 0.988, 0.976 and 0.949 for colour, tenderness, and flavour, respectively. Ekanem had reported similar observations in stored (dried) clam meat. Low temperature had a marked effect on the shelf-life of the mushrooms. Samples stored in the ECS (15±3°C) lost acceptability (mean) acceptance score [ 5.0) on day 6 of storage, whereas mushrooms stored at room temperature (28±2°C) lost acceptability on day 2 and day 3, respectively for samples stored without packaging and those packed in polyethylene films.
Table 3
Changes in Mean Panel Scores (9-Point Hedonic Scale) for Flavour, Tenderness, Colour and Over all Acceptance of P. Ostreatus During Storage
| Storage method |
0 |
1 |
2 |
3 |
4 |
5 |
6 |
| NRM |
8.7a |
6.1b |
5.5c |
4.9d |
- |
- |
- |
| NECS |
8.7a |
7.6c |
7.5e |
6.1b |
5.7bc |
5.1c |
4.3d |
| PRM |
8.7a |
6.6f |
4.5h |
- |
- |
- |
- |
| PECS |
8.7a |
7.5g |
7.5g |
6.8bg |
5.7c |
4.6d |
| |
|
|
|
Tenderness |
|
|
|
| NRM |
8.2a |
5.9b |
4.9c |
- |
- |
- |
- |
| NECS |
8.2a |
7.3cd |
6.9dj |
6.3j |
- |
4.1e |
- |
| PRM |
8.2a |
6.6e |
ND |
5.0h |
4.28 |
- |
- |
| PECS |
8.2a |
7.4cc |
7.0def |
6.5f |
- |
5.5g |
3.7h |
| |
|
|
|
Colour |
|
|
|
| NRM |
7.9a |
5.8b |
5.6b |
4.9c |
- |
- |
- |
| NECS |
7.9a |
7.9a |
6.1b |
5.7b |
- |
4.1d |
- |
| PRM |
7.9a |
6.5b |
5.9b |
4.9c |
- |
- |
- |
| PECS |
7.9a |
7.7a |
6.3b |
6.1b |
- |
5.2c |
4.0d |
| |
|
|
|
Overall acceptance |
|
|
|
| NRM |
7.8a |
5.5b |
4.3c |
- |
- |
- |
- |
| NECS |
7.8a |
7.8a |
6.9b |
6.3b |
- |
5.4c |
4.5d |
| PRM |
7.8a |
7.1a |
5.3d |
4.8d |
- |
- |
- |
| PECS |
7.8a |
7.8a |
6.9b |
6.2b |
- |
5.8bc |
4.7d |
NRM - Storage at room temperature without any cover
NECS - Storage in the Evapourator Coolant Structure without any cover
PRM - Polyethylene storage at room temperature.
PECS - Polyethylene storage in the Evapourator Coolant Structure
Column and row means carrying different superscripts are significantly different 0.05).
Mushrooms are reported to have a high protease activity which may cause deterioration of mushrooms, accompanied by undesirable changes in colour and flavour. Also, Meyer had reported that tannins (in which P. ostreatus is high) (Table 2) produce dark coloured complexes with metal ions, particularly iron, in stored plant foods. It has also been reported that tannins can cause astringency in foods. All of these factors (rapid breakdown of protein, production of dark compounds, off-flavour development and astringency) may jointly and severally account for the sharp fall in consumer acceptance of the mushrooms during storage.
There were significant effects (P [ 0.05) of mode and duration of storage on losses of weight in the mushrooms. Weight loss was maximum in samples stored at room temperature without packaging (Table 4). Mushroom samples given this treatment lost over 18% their weight within the first day of storage and over 70% by the third day when they also lost consumer acceptance. Comparatively low ([ 4.50%) but significant (P [ 0.05) weight losses were observed in samples stored in the ECS, whether or not they were packaged. This can be explained by the fact that the low temperature of the ECS slowed down physiological and respiratory processes. The relatively lower (P [ 0.05) weight loss in the packaged samples was due to reduced loss of water and availability of oxygen for metabolic losses during respiration due to the protective effect of the polyethylene bags. These are very well known effects in the storage life of plant materials.
CONCLUSION
This study has shown that oyster mushroom (P. ostreatus) is a fairly good source of protein and minerals. The mushroom contains some anti-nutritional factors, which are fortunately destroyed by heat. Proper cooking of the mushrooms should therefore be emphasised. The ECS, a traditional Nigerian cooling system, is demonstrated to be effective in extending the shelf-life of the mushroom. Recommendation and widespread adoption of this traditional device in the handling of mushrooms can markedly reduce the agony, frustration and losses suffered by rural dwellers, (mushroom harvesters, handlers and distributors) during gluts.
Table 4
Weight Losses (%) in P. Ostreatus During Storage
| Storage method |
1 |
2 |
3 |
4 |
5 |
6 |
| NRM |
18.50a |
40.70b |
70.30c |
- |
- |
- |
| NECS |
4.44b |
16.66a |
27.70c |
- |
35.10f |
44.40h |
| PRM |
5.55c |
25.90c |
- |
- |
- |
- |
| PECS |
3.70b |
9.25d |
20.30f |
- |
29.60e |
38.80a |
NRM - Storage at room temperature without any cover
NECS -Storage in the Evapourator Coolant Structure without any cover
PRM -Polytheylene storage at room temperature
PECS -Polytheylene storage in the Evapourator Coolant Structure
Column and row means carrying different superscripts are significantly different 0.5).
Mushroom Cultivation
The cultivation of edible Mushrooms is generally assumed to have begun in France around 1650. Gradually the cultivation spread first in Europe and in 1823, it was introduced in Netherlands.
Mushroom is a group of macroscopic fungi and lack of chlorophyll depends upon prepared nutrients. The terms Mushroom is often used loosely, however the common view is, the umbrella-shaped fungi belonging to Basidiomycotina, which are edible are called mushroom. In nature, mushroom grows wild in every country from snowy mountains to sandy desert, waste land, forest etc, and appear in all season but mainly in rainy season because organic matter decompose very easily.
Mushroom has to derive its nutrients from the organic matter on which it grows in common with many other. Mushroom is capable of using such indigestible substances as cellulose and lignin. Besides carbohydrates mushroom needs nitrogen but they can utilise nitrogen only in the form of protein and lignin. There are 1000 species of edible mushroom but use those that are cultivated by own hands or species you are familiar with and avoid all others. Earlier Mushroom was not particularly easy to cultivate, it was because their growing conditions were not properly known and it was practically impossible to influence those condition. It was only after the second World War that mushroom cultivation really began to develop in Netherlands as an Agro Industry. Around 1950, the first mushroom house equipped with ventilation and heating system was built.
ADVANTAGES OF MUSHROOM CULTIVATION
The artificial cultivation ensures that mushroom sold is truly edible. They are now regarded as useful food in modern diets, complementing the staple diet. Dieticians, to counter obesity and other syndromes associated with present-day eating habits, often prescribe them.
Plant residues such as straw, leaves, and also wastes from agriculture, forest and industry mostly remain unused. These are disposed off by burning or by some other wasteful and sometimes harmful methods.
However, by suitable treatment, these residues can be converted into substrates for the cultivation of mushrooms and the spent substrate can be utilized as manure.
Another advantage in mushroom growing is that they are grown in rooms, for which the wasteland may be utilized. Being grown in vertical stacks, for mushroom come into production very rapidly; makes mushroom growing a profitable venture.
There are various types of edible cultivated mushrooms prominent among them are:-
| Species |
General Name |
| Agaricus bisporus |
Button Mushroom |
| Entinus edobes |
Shiitake |
| Volvariella volvacea |
Paddy Straw mushroom |
| Pleurotus Sajor-Caju |
Oyster Mushroom |
| Auricular Species |
Wood Ear Mushroom |
| Flamblina Velu |
Winter Mushroom |
| Tremelia Fuctormis |
Silver Ear Mushroom |
| Pholiota Namelx |
Hameko/Vascid Mushroom |
The most commonly favoured variations in India are button, oyster and paddy straw mushroom.
Mushrooms contain higher amount of nucleic acid as compared to conventional foods. The comparison is presented as follows:-
| Food Item |
% Nucleic Acids (On dry weight basis) |
| Mushrooms |
2.1% |
| Cereals |
1.1% |
| Meat and Fish |
2.2% to 5.7% |
Mushroom protein is comparable to the high quality animal protein. It is superior to vegetables and cereals proteins. Hence it can substitute the non-veg diet and can provide a valuable source of high quality proteins to vegetarians. Mushrooms are regarded as one of the world's greatest untapped resources of nutritious and palatable food for future.
COMPARISON OF NUTRITIVE VALUE OF MUSHROOMS WITH OTHER FOODS
| Food acid (FAO) |
Essential amino acid Index (FAO) |
Amino Score |
| Mushroom |
98.6 |
90.0 |
| Beef |
100 |
98.0 |
| Chicken |
100 |
98.0 |
| Milk |
99.0 |
91.0 |
| Cabbage |
72.0 |
63.0 |
| Turnip |
69.0 |
68.0 |
| Tomatoes |
44.0 |
- |
Research data shows that mushrooms are highly nutritive food. Among all varieties of mushrooms, oyster mushrooms are virtually calorie free with high protein content. An analysis of some common edible mushrooms showed that on fresh weight basis the moisture content was 89-91 %; ash 0.97-1.26%; protein 2.78-3.94%; fat 0.25-0.65%; crude fibre 0.09-1.67%; carbohydrates 5.3-6.28% and energy value 24.4-34.41 K cal.
Agaricus bisporus contain 0.95% of manifold; 0.28% of glucose; 0.04% of pentoses; 0.59% of glycogen; and 0.90% of crude cellulose. Carbohydrates of mushrooms do not contain starch and cane sugar (sucrose). Glucose is present in very small quantity and like any other vegetable, mushrooms contain fat in small amounts. Therefore, mushrooms can be recommended as a 'Slimming diet'.
Many vegetables and cereals are deficient in some of the essential amino acids. Mushroom protein contain adequate quantities of most of the essential amino acids compared to those of egg protein, which is supposed to be a standard complete protein. A few essential amino acids, which are lacking in cereals are present in high concentrations in mushrooms. Therefore, mushrooms when supplemented with cereals in the diet will help in overcoming amino acid deficiency, particularly lysine. The mushroom protein is easily digestible and its overall quality is intermediate between vegetable and meat protein.
Most mushrooms are very poor in vitamin A and have high riboflavin and nicotinic acid, particularly thiamine, biotin and pentothenic acid. Folic acid, a B-vitamin known as a blood-building vitamin, is also available in mushroom. Thus, mushroom can go a long way to ward-off malnutrition. Mushrooms also have high mineral content, particularly phosphorus and potassium. Iron and calcium are in low concentrations, slightly less than a third of the total iron in mushroom is in the available form and can be readily utilized by the human body.
Mushrooms are a good source of several vitamins such as:-
- Thiamine,
- Riboflavin,
- Niancin,
- Ascorbic acid
Protein is the most critical component of food. Protein deficiency in the world is the most serious human nutritional problem. The quality of dietary protein is determined largely by essential amino acid present in these proteins.
Cereal and vegetarian diets which provide the bulk of proteins to the maximum population of the India are deficient in some of the amino acid particularly Lysine and Triptohen. Dietary proteins are split during digestion into their constituent units amino acids.
There are at least 20 amino acids, commonly found in food. Eight of them are classified as essential and they must be present in the diet. These eight essential amino acids can be listed as follows:-
1. Isoleucene
2. Leucine
3. Lycine
4. Methionine
5. Phenylalanine
6. Thronine
7. Tryptophen
8. Valine
In addition to them, Cystine and Tyrosine are usually included in essential amino acids as they have a sparing action on Methonine and Phenylalanine respectively.
SALIENT FEATURES OF MUSHROOM CULTIVATION
1. 100% risk free project: Heavy plant and machinery is not required, hence the capital investment is low. Similarly, running cost is also very low due to absence of any recurring maintenance expenses.
2. Low working capital: The raw material used for cultivation of mushroom is mainly agro waste like paddy and/or wheat straw. Hence, the requirement of working capital is very low.
3. Latest technical know how: The latest cultivation techniques, know how etc. for quality mushroom would be supplied by various agricultural universities, IARI constituents, CSIR labs etc.
4. Very high returns: Agro waste like paddy straw, wheat straw, sugar cane waste etc. are converted into compost, which is used as bed for cultivation of mushroom. Thus agro-waste is converted into on income generation activity.
5. Low execution period: The project can be executed from concept to commissioning within four months.
6. Easy financing: Mushroom cultivation is considered to be an agro project, which is thrust area for development. Hence finance is available from Banks on top priority.
7. Long term business: International as well as domestic market is growing at a faster speed. Presently there is huge gap in demand and supply. By a conservative estimate the domestic demand for mushrooms would be about 3,000,000 tonnes per annum by the year 1998. Presently only 5000 tonne is being supplied in domestic market.
8. Pollution free environment friendly project: The mushroom cultivation project is free from any type of pollution, rather it is helping the nature by maintaining the bio-cycle.
IMPORTANCE OF MUSHROOM CULTIVATION FOR INDIA
(a) Mushroom cultivation is a highly labour intensive activity. India has abundance of rural labour, which is suited for such a project.
(b) Mushroom harvesting cannot be effectively automated: Manual operations are best suited for Indian industry as it ensures creation of more employment.
(c) Mushroom helps in maintaining the cycle of nature by decomposing agro residues. This agro waste is available in abundance in our country.
(d) Mushroom is a good source of high quality proteins and rich in vitamins and minerals. It is an ideal food for vegetarian population in India.
(e) Mushroom cultivation provides excellent opportunity to educated rural youth to become entrepreneurs and provide jobs to others.
(f) Mushroom cultivation provides opportunity to use wastelands except water logged land, which is abundantly available in India.
(g) Mushroom cultivation provides excellent opportunity in rural areas near by the metropolitan cities to become economically sound by selling mushrooms in urban areas because of great demands of mushrooms in metropolitan cities.
(h) The rural women whether they are educated or uneducated can easily handle such type of projects very easily along with their house jobs and become economically sound.
TYPES SUITABLE FOR CULTIVATION
At present three mushrooms are being cultivated in India. These are: white button mushroom (Agaricus bisporus), paddy-straw mushroom (Volvariella volvacea) and oyster mushroom (Pleurotus sajor- caju). Of these, A. bisporus is the most popular and economically sound to grow and is extensively cultivated throughout the world.
However, due to its low temperature requirement, its cultivation is restricted to the cool climatic areas and during the winter in the plains of Northern India. In summer, the tropical paddy-straw mushroom is suitable for growing in most suitable parts of India.
Oyster mushroom can grow at moderate temperature ranging from 22° to 28°C. Therefore, it is suitable for most of the places in India.
In North India, the climatic conditions prevailing during different seasons can be exploited for growing mushrooms throughout the year. To this a year-wise production schedule is suggested:
| Mid-November |
Agaricus Bisporus |
| February to Mid-April |
Pleurotus Sajor-caju |
| Mid-June to mid-September |
Volvariella volvacea |
| September to November |
Pleurotus sajor-caju |
Cultivation of White Button Mushroom (Agaricus Bisporus)
Agaricus bisporus can be grown anywhere if the essential conditions are obtained or controlled. These conditions are: temperature, moisture, ventilation, and good spawn.
TEMPERATURE
The temperature requirement for the spread of the mycelium or vegetative growth is 22-25°C. For the reproductive stage or fructification; the temperature requirement is 14-18°C. Within the limits prescribed, the temperature should be uniform throughout the growth of the crop. If it is too cold the development of the spawn will be retarded or arrested. A high temperature will favour the development of moulds and bacteria, which will soon destroy the spawn or crop.
MOISTURE
Moisture is an important factor in the cultivation of the mushroom and needs careful application. The mushroom requires an atmosphere nearly saturated with moisture, yet the direct application of water on the beds is more or less injurious to the growing crop. They should be protected from a dry atmosphere or spring drought. When watering becomes necessary it should be applied in a fine spray around the beds with a view to restore the moisture in the atmosphere.
VENTILATION
Good aeration is essential for a healthy crop, as ventilation is one of the important factors governing mushroom production. Ventilation is responsible for the maintenance of congenial environmental conditions and also for the removal of toxic gas by the introduction of adequate fresh air. The information available indicates that the CO2 level of 0.10 to 0.15 per cent volume is necessary during crop production and this can be achieved by giving 4 to 6 air changes/hour or introducing 10 cubic ft fresh air/sq ft bed area/hour. Van Soest (1977) gave a rule of thumb formula, i.e., at a bed temperature of 16°C, one cubic metre of fresh air per hour per square metre of bed area for every kilogram of mushroom produced. Every degree centigrade increase in bed temperature above 16°C increases the production of CO2 by about 25 per cent. This implies that the number of air changes must be increased by 20 per cent. However, drought must be avoided as it will cause rapid desiccation and the beds will also be affected.
GOOD SPAWN
Spawn is merely mycelium from a selected mushroom grown on some convenient medium and it is the strain of mushroom selected which decides the type of mushroom the spawn will produce. The essential qualities of good spawn are:
(a) It should be of a strain originating from a single specimen of a perfect crop.
(b) It should have the following aspects: The substratum must be covered with the white mycelium, it must be uniform and at the moment of removal from the container, should be absolutely free not only from mould but also from all other microorganisms. Although some of these characters may be visible at a glance, a good spawn cannot in principle be distinguished from bad spawn merely by looking at it. Sometimes odour may help to remove the suspicion. Fresh spawn has a strong mushroom odour, dried spawn is odourless. But only a thorough examination and test can establish whether the spawn is good or bad.
SUITABLE GROWING SPACE
Mushrooms may be grown successfully in a variety of places. Commercial and amateur mushroom growing is done indoors.
The following space requirements are necessary for successful production:
1. The location should be easily accessible so that the manure and casing soil can be brought in and removed with ease.
2. The room should be well ventilated.
3. No direct sunlight should fall on the bed. Diffuse light however, will not harm mushroom growing.
4. The room temperature should not exceed 20°C during the growing period.
5. Heating facilities should be provided so that the room may be heated when the temperature drops low.
6. The location should have sufficient protection and insulation so that it is not subjected to sudden fluctuations in temperature, since mushrooms cannot withstand sudden changes in temperature.
7. Location for growing mushrooms should not be too moist. The idea has gained ground that mushroom should be grown in humid, badly ventilated rooms. This is an entirely wrong notion. Mushroom does not develop well in too high humidity and will not develop at all with insufficient ventilation.
8. The best way would be if each unit is filled at one time and is arranged so that it can be closed up tightly and completely isolated from its surroundings, in order to facilitate the fumigation and disinfection of the beds.
9. Near the location of mushroom growing, there should be good fresh water supply, availability of the fertilisers for making compost and a good market for the disposal of the mushroom.
Mushrooms have been grown successfully in cellars, garages and in any abandoned room. For the cultivation of white button mushroom (Agaricus bisporus) the following steps should be adopted.
- Compost and methods of composting
- Spawn and methods of spawning
- Casing
- Harvesting
COMPOST AND METHODS OF COMPOSTING
Compost is the substrate on which mushroom grows. The biochemical activities of a number of microorganisms make the substrate selective for the growth of mushroom, A. bisporus. The process of compost making is known as Composting.
Composting is defined as indefinite microbial degradation of organic wastes. These wastes include vegetable and animal matter, forest litter, remains of stubbles and roots in the soil, green manure, straw, household garbage, sewage sludge, animal manure, etc. The process of composting involves microbial proteins and conditioning of the fibrous material to absorb and retain moisture. In addition, the microorganisms change the physical properties of compost and make the growth of the competitive microorganisms more difficult.
The quality of the mushroom compost depends on:
- nature and quality of basic materials,
- organic and inorganic supplements and
- management of the compost during composting.
NATURE AND QUALITY OF THE BASIC MATERIAL
Compost making with horse manure and its straw bedding is the most conventional method adopted by commercial growers. Horse manure, bedding (straw) and urine form the most balanced medium for rapid decomposition and do not need any supplementation for making good compost. Some horse manure compost also needs supplementation to make good compost when it is collected from a cleaned stable; where it does not receive a major part of the urine, an addition of small amount of inorganic nitrogen will give better result. In case of the manure with less bedding, addition of straw provides good physical condition to the compost and makes a better substrate for the growth of Agaricus bisporus.Keeping these elementary principles in mind, one can proceed to make good compost for A bisporus.
According to Atkins, horse manure is the best substrate although the manure of mules is as good as that of horses. He could not find that cow manure had any advantage over horse manure. One-third manure of well-fed cattle with two-third horse manure worked very well. Peat moss mixed with loam used as bedding of horses was an acceptable supplement to the horse manure.
In cattle manure the problem is of high variability of the raw material used as cattle feed. The important factors are the proportion of straw in the manure, its moisture content, age, method of collection and storage. Old, heavy weight manures are valueless for composting as they are considerably decomposed and have lost the ability to heat up. Relatively fresh cattle manure in which the straw still retained its original colour to a large extent proved to be very satisfactory for composting. The very strawy manure does not compost properly and remains tough and spongy, whereas the strawless manure makes a very compact heap, having large anaerobic zones, intermediate manure can be used. In cattle manure nothing except gypsum should be added.
Since horse manure is becoming scarce, attempts have been made to find suitable substitutes. In order to produce an economical and competitive artificial manure or "synthetic" compost, industrial wastes and agricultural byproducts can be used. There are few factors which should be kept in mind for selecting a substitute for horse manure:
(i) The composting period of the substitute should be the same or lower than the horse manure
(ii) It should be easily available to the growers and at competitive rates as the horse manure
(iii) Its production capacity should be equal or better than horse manure.
Several workers have studied the possibility of wheat straw, barley straw, rice straw, rye or oat straw, maize stem, corn cobs, etc. mixed with organic and inorganic supplements as a replacement for making the synthetic compost.
In preparing the compost from straw as the only plant residue many difficulties are faced. Mainly it is the slowness with which the straw gets wetted followed by delayed action of microorganisms. On wetting the straw, a sequence of microbial events is initiated. First a mixed flora (bacterial, actinomycetes and fungi) of mesophylic nature which grow and multiply below 40°C (104°F) increases in number. As the temperature of the pile increases, a thermophilic and thermotolerant flora which can grow and multiply at temperature above 40°C take over. This flora survives until peak heat is terminated by cooling, then there is again an increase in number of mesophilic organisms especially in long method of composting. Microorganisms make use of nitrogen and carbon for their metabolic activities. The energy required for this process is derived by aerobic and anaerobic decomposition. Wheat straw is mostly used for making the synthetic compost. In rice growing area rice straw is also used but the quantity of rice straw should be more as compared to wheat straw.
Barley straw can also be used for making the composts. This straw softens in shorter period during composting. The yield of mushroom is the same, both in the case of wheat and barley straw, but the compost produced from the barley straw is much less.
Stoller reported that fibrous material like spent licorice roots (from which the licorice has been extracted) and spent tannery nuts, bark and leaves (byproducts after tanning extraction for industrial use) are even more satisfactory than straw. These materials already contain sufficient moisture, they are suitably decomposed and require only a short or no microbial decomposition.
After much experimentation on composting it has been found that a certain balance between cereal straw and a plant material in a green state can form an ideal mixture for the preparation of a mushroom compost. The green material, whether freshly harvested or dried, will hold the water and absorb the added water readily and will begin to undergo immediate decomposition. Temperature also rises rapidly and within a few days, the compost is ready. The green material supplies the microorganism with some of the nitrogen and the minerals which are required for the decomposition of the straw although sometimes additional inorganic salts are required, depending upon the nature of the material used and their relative concentration. Compost with maize stem has been tried. In this case a year old well-preserved maize stem is cut into small pieces and mixed with wheat straw in the ratio of 2.5:1 on the basis of dry matter. The straw improves the structure of the material. About 1.2:1.5 parts of broiler manure is also added to enrich the nitrogen content of the compost. Compost with crushed corn cobs can also be prepared. Crushed corn cobs and wheat or rye straw in the ratio of 2 to 1.5 is the most ideal ratio. On the basis of dry matter, broiler manure can be used as a nitrogen supplement to corn cobs.
As an alternate to cereal straw, the primary ingredients for mushroom substrate can be vegetable material such as sugarcane bagasse, pulverised tree bark and wood waste.
Sawdust can also be used for making compost. Sawdust is advantageous over compost compost material, as it does not require grinding and is uniform in composition, it is easy to mix and handle. Hard wood such as oak, birch, beech and maple is suitable for the purpose. The unsuitability of soft wood is due to the presence of resins and lignin.
Sewage sludge is a very desirable supplement for sawdust. It is dried and mixed thoroughly with the saw dust before composting. If the sludge is not dry but watery or diluted, only a small quantity can be added without making the sawdust too wet. If the sawdust is partially dried and pasty it is very difficult to mix. Sludge is a good source of microorganism and the microbial growth substances, which may be very helpful in composting. Sawdust compost if correctly made is a useful substitute for horse manure compost. The temperature in the sawdust does not go very high during composting but if sludge is added to the sawdust, then the temperature goes a little higher than where sludge is not mixed. The required temperature during composting can be attained with nitrogen supplement.
ORGANIC AND INORGANIC SUPPLEMENTS
In the preparation of synthetic compost the presence of nitrogen, phosphate and potassium in different ratio is essential. Deficiency of any one of these will cause reduction in yield. The number of sources hardly matter as long as they provide the desired ratio. The C : N ratio plays the most important part and for good compost this ratio is about 17:1. The supplementation of organic matter for an optimum result varies as per the basic material.
Nitrogen supplementation is also a very important factor. Deficiency of nitrogen often limits the yield, but by increasing the nitrogen, the yield increases. Increase of nitrogen should be up to 3 per cent level of the finished compost at the time of spawning. During the early stages of composting, much of the nitrogen is ammonified and in later stages, the ammonia re-combines with microbial protein which is a good nutrient for mushroom. Ammonia as such is very toxic to the mushroom.
The amount of nitrogen supplement is calculated in such a way as to give 2 to 2.5 per cent total nitrogen content in the starting mixture. Organic nitrogenous sources are better than inorganic ones because they supply carbon, potassium, phosphorus and also have a better heating capacity. Organic nitrogenous material may be unsatisfactory sometimes due to the presence of toxic substances. The selection of the nitrogen source depends upon the cost of the material comparable to the yield of mushroom obtained. The supplementation of organic matter for good results varies as per the basic matter. In the case of inorganic nitrogenous substances like ammonium salt, and cyanamide, special precautions should be taken while nitrates may be used freely.
The poultry manure can be used to replace part of the organic nitrogen supplement and to give good yield. It also adds a significant amount of fine dry matter to the compost which helps to counteract the strawiness of the horse manure and improve the texture of the compost. For supplementation of the nitrogen source any other nitrogen-rich organic material can be used. The amount of organic matter and nitrogen have to be the same as in chicken manure. If less chicken manure is used, it is possible to apply urea or ammonium nitrate as nitrogen source but if the amount of chicken manure becomes too small, the yield is negatively affected because of the shortage of the available carbon source. The structure of the compost is very important and there should be definite dry matter, water, air ratio during composting in order to have an optimum heating of the compost. If the straw is very fine for synthetic compost, less chicken manure can be used.
In the case of fresh horse manure, increasing the amount of ammonium sulphate and calcium carbonate generally increases the yield, but the reverse is the case with old horse manure. Increasing the amount of ammonium sulphate delays the decomposition in the pile, while a very high amount completely stops the fermentation. Increasing the amount of calcium carbonate slackens down the decomposition but does not reduce the yield. The addition of a limited amount of ammonium sulphate shows faster decomposition. It is necessary to study the combination of ammonium sulphate and calcium carbonate thoroughly. One should be careful to add the right type of supplement, as chicken manure does not increase the yield with the combination of ammonium sulphate and calcium carbonate along with cotton seed meal, it is more effective. Similarly, ammonium sulphate with or without limestone does not give an increases in the nitrogen content of the compost but it increases the ammonia content which reduces the yield. Ammonia content above 0.3 per cent reduces the yield. There is a highly significant correlation between nitrogen and yield for synthetic compost but not for natural compost; therefore, a nitrogen supplementation which increases nitrogen without any increase in ammonia contents is desirable.
Supplementation would be much cheaper if the ammonia from a cheap nitrogen source such as sulphate of ammonia could be converted into microbial protein by the microbes. This can be possible with the addition of available carbohydrate to the compost. Most often organic nitrogen is used as an activator, ammonium nitrate is the basic inorganic nitrogen supplement. Urea is often used as a source of free NH3 during composting.
The composting process must, therefore, be regulated to produce a high amount of protein and a minimum amount of ammonia. Cotton seed meal, wheat flour, dried skim milk, fish meal, gluten meal, linseed meal, soybean meal, malt sprouts, meat scraps, ground rye grain, cotton steep liquor, Brewer's grain, molasses, corn syrup, etc., were used by Schisler. Out of all these sources, cotton seed meal gives the best results. It means that the plant concentrates having a high protein content gives a greater increase in yield than the animal concentrates. Molasses encourage the growth of bacterial and other moulds and hence reduce the yield. The combination of cotton seed meal, molasses, flour, etc., with skim milk gives an increase in yield whereas no significant increase was observed when they were added separately or in combination with each other.
The increase in yield is not achieved by merely adding more nutrient but it is increased by adding that particular/nutrient in which the compost is deficient. An addition of nutrient in an already balanced compost would not help to increase the yield. After a certain limit of supplementation there is no further increases in yield, it is perhaps due to the poor growth of either the composting microorganism or the mushroom mycelium itself. When a higher amount of supplement is added, sometimes heating occurs which affects the yield.
MANAGEMENT OF THE COMPOST DURING COMPOSTING
There are two main methods of composting- long method and short method. The long method takes about three to four weeks whereas composting by short method takes 12 days.
Long Method
The compost should be prepared on a well-cleaned, pucca and preferably cemented floor. It may be done either in the open or under a shed whose sides are open. If composting is done outside, then the heap should be protected from rains by coveringthen the room should be well ventilated.
There are two types of compost: (i) natural compost and (ii) synthetic compost.
Natural Compost: Natural compost is prepared from horse dung obtained from stables in which abundant wheat or barley straw has been used for bedding. It is desirable to add one-third the weight of wheat straw to the horse dung. It should never contain an admixture of dung from other animals but 100 to 110 kg chicken manure and 3 kg urea per tonne may be added. The dung must be fresh and must not have been exposed to rain. The manure as obtained from the stable in a damp condition is made into a heap 1 metre high. After 3 or 4 days, when the heap begins to steam due to fermentation and gives off an odour of ammonia, it is opened up. This is repeated 4 to 5 times at an interval of 3 to 4 days. Twenty-five kg gypsum per tonne of horse dung is added in two instalments at the second and third turning. At the final turning, nematicide is mixed in the manure.
Synthetic Compost: The following ingredients are required.
| Wheat straw (chopped 8 to 20 cm long) |
250kg |
| Wheat bran |
25kg |
| Ammonium sulphate or calcium ammonium nitrate |
4kg |
| Urea |
3kg |
| Gypsum |
20kg |
This will make compost to fill up about 15 to 16 trays.
Wheat straw is spread over a pucca floor and wetted thoroughly by sprinkling water. Wheat bran and other ingredients except gypsum are mixed thoroughly in wet straw, which is finally stacked into a pile about 1 metre high and 1 metre wide. The heap is compressed by applying light pressure.
The heap with mixed ingredients can also be made with the help of the wooden mould. It has three wooden boards-one end board and two-side boards. The side boards can be attached with the end board by clamps as shown in. The whole board is kept on the ground. The mixed compost ingredients are put in the mould and compressed slightly. The side boards are detached from the end board and are moved lengthwise, again the mixed ingredients are put in the mould, this way a long pile of the compost can be made. The pile should not be pressed tightly otherwise anaerobic condition will set in. If a long heap is made then perforated pipes can be placed vertically in the heap for aeration. It is essential to open the entire pile and re-do it a number of times according to the following schedule.

| Stack the heap |
0 day |
| 1st turning |
5th day |
| 2nd turning |
10th Day |
| 3rd turning |
14th day, add 10kg gypsum |
| 4th turning |
18th day, add 10kg gypsum |
|
| 5th turning |
22nd day, spray with 40ml nemagon |
| Final turning |
26th day, spray 10ml melathion in 5 litre water |
At each turning water should be sprinkled to make up the loss of water due to evapouration. The compost, when ready for spawning, is dark brown in colour and without any smell of ammonia and has sufficient moisture when pressed between the palm.
Many formulae have been given by different workers.
Formulae given by Indian Institute of Horticultural Research, Banglore:
Formula 1
| Wheat straw (6 inch pieces) or |
300kg |
| Paddy straw |
400kg |
| Ammonium sulphate or calcium ammonium nitrate |
9kg |
| Superphosphate |
9kg |
| Urea |
4kg |
| Wheat bran |
30kg |
| Gypsum |
12Kg |
| Calcium carbonate |
10kg |
Straw must be kept wet for two days. When paddy straw is used, add 6 kg cotton seed meal on the 4th turning. All fertilisers are broadcasted on moist straw before making the heap.
Formula 2
| Paddy straw |
150kg |
| Maize stalk |
150kg |
| Ammonium sulphate |
9kg |
| Superphosphate |
9kg |
| Urea |
4kg |
| Rice bran |
50kg |
| Gypsum |
12kg |
| Calcium carbonate |
10kg |
| Cotton seed meal |
5kg |
These two formulae are used for long methods of composting and schedule of turning is days 0, 6, 10, 13, 16, 19, 22, 25, 26 (filling).
Formula 3
| Horse manure |
430kg |
| Wheat straw |
250kg |
| Chicken manure |
100kg |
| Brewer's grain |
30kg |
| Urea |
7kg |
| Gypsum |
20kg |
Formula 4
| Wheat straw |
300kg |
| Chicken manure |
120kg |
| Rice bran |
20.6kg |
| Brewer's grain |
22kg |
| Urea |
6kg |
| Cotton seed meal |
5kg |
| Gypsum |
10kg |
Formula 5
| Wheat straw |
1000kg |
| Chicken manure |
400kg |
| Brewer's grain |
72kg |
| Urea |
14.5kg |
| Gypsum |
30kg |
Formula 6
| Paddy straw |
3 ton |
| Chicken manure |
1½ ton |
| Wheat bran |
125kg |
| Gypsum |
90kg |
Formula given by Seth (1975)
| Long method of composting |
|
| Wheat straw |
1 ton |
| Calcium ammonium nitrate (CAN) |
30kg |
| Superphosphate |
25kg |
| Urea |
12kg |
| Sulphate of polash |
10kg |
| Wheat bran |
100kg |
| Molasses |
16.6 litre |
| Gypsum |
100 kg |
| Nemagon |
266 ml |
Turning schedule
| 0 day |
Stack |
| 1st turn |
5th day (50 per cent nitrogen fertiliser) |
| 2nd turn |
7th day (molasses) |
| 3rd turn |
10th day (gypsum + nemagon and fill in the container) |
It was allowed to remain in the container for 8 to 10 days. The temperatures in and outside compost as well as in the container ranged between 72 and 76°C.
Formulae given by Garcha (1981)
Formula 1
| Wheat straw (Turi) |
300kg |
| Calcium ammonium nitrate (CAN) |
9kg |
| Urea |
3kg |
| Superphosphate |
3kg |
| Muriate of potash |
3kg |
| Wheat bran |
15kg |
| Molasses |
5kg |
| Gypsum |
30kg |
| Lindane dust or BHC (5 per cent) |
250kg |
| or |
|
| Linotox |
60ml |
| Nemagon |
30ml |
Formula 2
| Wheat straw |
300kg |
| Poultry litter |
60kg |
| Calcium ammonium nitrate (CAN) |
6kg |
| Urea |
2kg |
| Superphosphate |
3kg |
| Muriate of potash |
3kg |
| Wheat bran |
15kg |
| Gypsum |
30kg |
| Lindane dust or BHC (5 per cent) |
250kg |
| or |
|
| Linotox |
60 ml |
| Nemagon |
30ml |
Paddy straw can also be used instead of wheat straw. However, the equivalent of 300 kg of wheat straw should be 400 kg paddy straw. The other ingredients remain the same.
Formula given by the Srinagar laboratory
| Wheat straw |
300kg |
| Molasses |
12kg |
| Urea |
4.5kg |
| Wheat bran |
50kg |
| Gypsum |
12kg |
| Muriate of potash |
2kg |
| Cotton seed meal |
5kg |
Short Method
| Described by Sinden, this composting has two phases. |
|
| Ingredients |
|
| Chopped wheat straw |
1000kg |
| Chicken manure |
400kg |
| Brewer's grain |
72kg |
| Urea |
14.5kg |
| Gypsum |
30kg |
Phase I. Outdoor composting. Prestacking-four days
Brewer's grain and chicken manure are added to wheat straw. Sufficient water is added but there should be no leaching. The stack should be 3.3 Ã- 2.5 Ã- 1.0 metre. Give turning and make the stack of slightly smaller size (3 m Ã- 2 m Ã- 1 m). Straw is trampled with feet and watered if necessary.
| 0 day |
Prepare heap in the usual way as in long composting. Add full quantity of urea and spray water if necessary. |
| Day 2 |
Give first turning. |
| Day 4 |
Give second turning and add full quantity of gypsum. |
| Day 6 |
Give third turning. |
| Day 8 |
Fill in trays for steam pasteurisation. |
The pH of compost should be 8.5. In case it has less nitrogen supplementation should be done but the nitrogen should not exceed 2 per cent of the dry weight.
Phase II. It has two main purposes.
- Conversion of ammonia into microbial protein.
- Pasteurisation-Killing of microorganisms which are competitors and to make the substrate suitable only for Agaricus bisporus.
Phase II can be completed either by steam heat or fumigation with methyl bromide.
Steam pasteurisation: Initially live steam or dry heat is introduced to raise both air and compost temperature and then fresh air is introduced to establish anaerobic fermentation. For this phase the temperature should be between 52 and 60°C in the compost. There should be free circulation of moist air around the beds and oxygen supply should be between 15 and 20 per cent. For these conditions a well-insulated room is required. Trays evenly filled with compost are stacked in a pre-warmed room as quickly as possible to avoid heat losses. Sufficient space is kept between the trays to allow the free movement of the air. All ventilators and doors are closed. Live steam is introduced to raise the temperature of compost up to 52 to 54°C. This temperature is maintained for 2 to 4 days. After that, the temperature of the compost is further raised to 58 to 60°C for 4 hours. The steam supply is shut off and fresh air is introduced slowly and gradually by controlling the ventilation system to lower the temperature of the tray beds (2 to 3°C per 24 hours). The temperature of the bed is lowered to 52 to 54°C and the same temperature is maintained for 4 days. By this time ammonia completely disappears from the compost and the temperature is further lowered to 24°C. Now it is ready for spawning. Fresh air circulation is essential throughout phase II to equalise the temperature and to supply oxygen to every part of the compost. Lack of oxygen in phase II reduces the thermogenesis within the compost. If with sufficient oxygensupply there is a weak thermogenesis it shows that the phase I condition was extended too long or the condition of phase I was not proper.
In phase II, if the ammonia smell persists for more than 60 to 72 hours it denotes that the composting process was not correct or excess of nitrogen was added in the beginning. Sometimes the air temperature is raised to 55 to 60°C to kill the insects and spores of competitors. This process is done at the end of phase II when active thermogenesis is completed otherwise there will be overheating of the compost. Phase II ends abruptly with a rapid decline of temperature to 25°C. Spawning is done immediately.
A COMPOST FERMENTATION METHOD BY MEANS OF FORCED AIR CIRCULATION
This method was devised by Neng. This is actually a process of outdoor composting with indoor pasteurisation.
Fermentation Chamber for Compost
A hollow double-sheet plastic cloth sealed all the edges by heat. The plastic cloth has to exclude ultraviolet light. Redmud plastic is used in this experiment. Once the air is sent to the compost centre and flown out into chamber, space increasing its pressure within, and the hollow air pack is filled up with air, it becomes immediately a fermentation chamber of compost.
Formulation of Compost
By the conventional method in Taiwan, the compost has been made from rice straw and some chemicals with a ratio by weight as follows:
| Rice straw |
100 |
| Urea |
1 |
| Ammonium sulphate |
2 |
| Calcium superphosphate |
2 |
| Calcium carbonate |
2 |
| Lime |
2 |
| Water |
200 |
Process of Composting and Fermentation
Rice straw was cut to 10-12 cm before adding the lime solution for preparing the stack. Two days later all chemicals described above are added, and the proper amount of water is given, for the stacking. When the first turning is done on fourth day after stacking, the turned compost is put on the plastic film prepared on the ground. An air duct is laid across under the centre of compost and connected to a blower. Then everything is covered with the specific double-sheet plastic cloth. When the blower starts, the air is sent through the air duct to the compost centre and it flows out into the chamber space increasing gradually its air pressure within. Eventually, the plastic cloth becomes an arch-shaped fermentation chamber. The air inside is returned to the blower's inlet by forced circulation continuously. On one hand, a small amount of fresh air is provided, on the other hand, the exhausted air is led into the air pack between the double plastic layers before being discharged into the open air. This is to maintain the temperature in the fermentation chamber. During the endless air circulation, the compost temperature rises gradually until it reaches the designated temperature. There is no need of extra heating. The whole process takes about 10-12 days.
MECHANICAL COMPOSTING
Barrel composting is a type of mechanical composting. A method of barrel composting is devised by Baker, is as follows: The octagon-shaped barrel is 16m long and 3.8m across, with five circular steel bands spaced along its length on the outside. The support frame is made of steel, with the eight flat surfaces of marine ply. Barrel capacity of 40 tonnes is sufficient to produce compost for 55m2 of cropping areas.
Power is supplied by 5.6 kW motors driving two hydraulic pumps, in turn to two hydraulic motors, each with gear boxes on inverted heavy duty Thornicraft differentials. The barrel is mounted on ex-aircraft tyres. Speed is variable from one revolution per hour to one revolution per minute. Normal operating speed is one revolution every eight minutes.
Air system: A unique air system features ducting built within the structure of the barrel, consisting of vented plywood plates across each corner of the octagon. The pressurised air distribution system runs the length of the barrel and is designed so that as the barrel revolves, air enters only from ducts along the base and is forced up through the compost.
Water: The water system consists of four main rails running the length of the barrel, with 12 misting nozzles along each rail. As the barrel revolves, only the top two rails at any time are in operation, discharging water at 280 kPa pressure. Water is stored in a 5000 L reservoir, which in winter is heated to 44°C.
Compost is based on wheat straw, requiring approximately 350 bales per fill. Activator ingredients consist of:
- cattle manure
- poultry manure
- cotton seed meal
- cotton seed hulls
- gypsum
- lime
with the aim of having a nitrogen content of 1.5 per cent entering peak heat. Materials are kept clean and dry and the manure screened to remove any objects that may damage equipment. Individual ingredients are measured and mixed in a concrete agitator for transport and dispensing at the point of filling the barrel.
Loading the Barrel
Straw is pre-wetted in batches of five bales (each of 20 to 25 kg) for four minutes in a dip tank. Bales are allowed to drain, leaving them with approximately 50 per cent of total water requirements. They are then carried by an air operated lifting station on to a conveyor where the bale ties are cut and counted. As the straw moves along the conveyor it is mechanically loosened, then fed into a Gehl forage harvester which cuts it to 4 to 5 cm.
The cut straw enters a hopper where it is mixed with the activator at the rate of 55 L per bale, so that the activator adheres to the moist straw as it enters a blower, which lifts the mixture up and into the barrel.
Composting Cycle
| Day 0 |
after filling the barrel is closed and rotated for 45 to 60 minutes so that the compost is levelled and mixed; at the same time 5000 L of water is added. |
| Day 1 |
1600 L of water is added and the compost is rolled and steamed for eight hours. Steam is introduced through the water system. |
| Day 2 |
all water jets are removed, their spray patterns checked and cleaned if necessary. 50 kg of ammonium nitrate (34 per cent nitrogen) dissolved in 2000 L of water is then added to the compost. |
| Day 3 to 6 |
each morning 1600 L of water is added to the compost as it is rolled and aired. The compost is further rolled and aired each afternoon. |
| Day 7 |
the moisture content of the compost is tested and adjusted to 70 to 72 per cent. |
| Day 8 |
barrel emptied. |
Four central hatches are opened and the barrel is rotated intermittently so that the compost falls from the hatches on to a drag elevator, to a transfer belt, then on to a filling belt.
Trays are fed along a conveyor underneath the barrel, filled, stacked and transferred to the peak heat room.
The barrel is not completely self-emptying, but only the last 500 to 600 kg of a total of 40 tonnes has to be emptied manually.
For composting by any method the size of the heap is a very important factor. If it is large, then the compactness will be less and aerobic conditions will be there. Penetration of the air is affected by the difference of the external and internal temperature and by the compactness of the pile material, i.e., in summer less ventilation is needed and the pile must be kept smaller with loose, long straw. The side must be trampled down to prevent free penetration of air, which would carry away the ammonia and lower the temperature.
In Barrel system air was forced through the compost for making an aerobic and uniform compost. The entire Phase I cycle from straw wetting to Phase II was eight days. This system was later abandoned because of cost and compost quality.
In the mid 1980's in Austria and in Switzerland traditional Phase I composting systems were developed. These farms were very similar and both were built enclosed for the purpose of highly controlling odour emissions. All aspects of composting were carried out indoors. All process, air streams were treated using a biofilters before discharge. Materials were moved around computer controlled robot cranes during pre-wetting, with Phase I being carried out in pressed block of compost with ventilation. Capital and operating costs for these farms were high resulted into closing of the farms.
Generally, in the low temperature composting there was a short pasteurization phase at about 60°C for a few hours, and then about a week of composting at around 47°C. The lower temperature composting not only controls odour but also saves raw ingredients substantially and the fostering of the thermophilic fungi populations which make compost selective and promote mushroom growth.
In general, low temperature methods did not produce compost equivalent to traditional methods, as these materials had poorer bulk densities and produced lower yields per bed surface area. In commercial practice, Vestizens found low temperature Phase I composts gave poorer yields and were less selective than enclosed composting methods having a high temperature (around 80°C) phase, Miller found selectivity to be excellent in their low temperature composts reported for tunnels using pull nets, where the nets could interfere with uniform air flow. In commercial practice Gulliver found enclosed high and low temperature Phase I compost to be the same in terms of yields, and that both enclosed methods were inferior to traditional methods.
In the past few years, commercial enclosed composting tends to follow the Italian practice of high temperature Phase I followed by a fairly standard Phase II in tunnels. Laborde worked on enclosed composting which is in recent practice. Utility of bunkebeen demonstrated by Overstijns. Modifications in enclosed composting done by different workers made commercial growing successful.
Very high composting temperature of around 80°C tend to kill most microbes within compost, including all of the fungi and actinomycetes and most of the bacteria. Phase I tunnels can allow temperatures throughout the composting mass to become uniformly hot enough to eliminate populations required to complete Phase II. Currently three strategies are being used to deal with this problem. Materials from Phase I tunnels can be re-inoculated at the beginning of Phase II, Ventilation can be used in the tunnel cooler than 60°C thereby maintain desired population 5 to 10% of the material. Phase I can also be carried out in a bunker where the top and side layers of the compost will loose sufficient heat to prevent the entire composting mass to reach very high temperatures, and this cooler compost is then remixed with the hotter compost as an inoculant on removal of the compost from the bunker.
It is better to have the basic ideas of ideal composting to enable to have the better results in enclosed methods of composting. According to Miller the goals to be achieved in compost, ready for spawn run and cropping includes are:
- Suitable bulk density i.e., wet weight bulk density of an approximately 550 to 600 kgm3, related to straw softening and other structural charges.
- Modification of plant materials so that nutrients are made available to the mushroom crop.
- Biological removal of readily available initial nutrients to avoid overheating and competitor growth either Phase II or spawn run.
- Building up of an appropriate bio-mass and a variety of microbial products, some of these can serve as a nutrient source for the mushroom.
- Establishment of selectivity, i.e., the composting promotes the growth of Agaricus over competitor organisms. Selectivity is based on nutrition, structure, and other factors.
- Modification of compost structure, so that it holds more water within the straw.
- Building up of compost moisture content to serve as a water reservior for the mushroom crop.
- Conversion for nitrogen into stable organic forms, making nitrogen available to Agaricus but not prone to further ammonification by competitors.
Selection of Enclosed Composting: Method of enclosed composting is determined according to the site. In Western Europe, where composting yards are very large, odour and ammonia emission should be controlled. Phase I is carried out in completely enclosed tunnels and process air is treated by air washers and bio-filters before discharge. The places where the rules on atmospheric emissions are not very strict, bunker systems are appropriate, while open bunker systems will permit some emissions to the atmosphere odour will be less compared to the conventional open air composting. Places, where adverse weather conditions exist and make traditional composting difficult, enclosed Phase I system should be followed.
Enclosure should be decided in local community depending on economies and local community standards. Enclosed Phase I methods can save money in the areas of lower raw material losses, smaller land requirements, shorter process duration, lower labour cost and consistency of mushroom production.
Bunker systems rely on keeping outer zones of the compost cool enough (less than 60°C) so that thermophilic fungi and actinomycetes which are important to Phase II are not killed. For this, retaining walls should not be heavily insulated as some level of ambient airflow across the top of composting mass is required. Bunker system will cost less than a tunnel system.
Tunnel systems which achieve uniformly high temperatures require the compost to be re-inoculated with beneficial micro-organisms, so that Phass II can be carried out. In commercial practice, inoculation of the Finished Phase I material is made with a finished Phase II compost. At this time, inoculants for high temperature Phase I materials are in the development stage.
Commercially, in bunker system about 25% of the Phase I composting mass should be maintained below 60°C, so that remixing the entire mass at the start of Phase II will provide sufficient self-inoculation to the remainder of the compost. This mixing of re-inoculation gives the variable result as compared to using a specific inoculant. Better process monitoring and control of the bunker Phase I might allow better and more consistent development of populations suitable for self-inoculation during the Phase I process.
The practice of enclosed composting is becoming popular, improvement will further make the mushroom growing more successful. While low temperature single phase methods of preparing compost can be used to grow mushrooms. High temperature Phase I appears to be more advantageous in producing high yielding commercial composts.
Futher research towards enclosed composting with environmental control may cost less than the traditional method of composting in future.
It is necessary to chop the straw in order to facilitate the retention of heat and moisture both during the composting period and during the sweating out process. Chopped straw is also easier to handle. Long straw binds and is laborious to mix. Chopped straw compost is better than straw which is partially chopped or not chopped at all. The length of the composting period is influenced: (i) by the nature and subdivision of the fibrous material, and (ii) by the aeration of the compost pile. The size of the pile also affects the composting and accordingly the yield. The smaller piles have a relatively large surface exposure to the atmosphere, so that almost all parts of the piles receive good aeration, reverse was the condition in the case of a large pile. Good aeration is also obtained by placing a ventilatory in the centre of the large pile. When preparing the compost with straw it is necessary to compress the straw in order to prevent too much aeration from drying out and cooling in the straw compost, whereas with closely packed material it is necessary to make special provision for aeration. When good aeration is provided manure can be composted in seven days. The CO2 concentration at a point in the pile is more dependent on the width of the pile than the height.
During composting, moisture is also very important. If the chemical composition of a compost is good, the course of the composting process depends upon the dry matter, water, and air ratio in the compost. This ratio is highly dependent upon the moisture content and the force with which the compost is compressed.
If moisture is low during composting, bacterial decomposition is arrested and nitrogen escapes as ammonia and other volatile forms of nitrogen. At a very high moisture level, unaerobic conditions set in and bring down the speed of the decomposition. Depending upon the nature of the composting material the moisture level can be adjusted. If the compost is wet (more than 70 per cent) there is a low supply of oxygen. Due to the slow activity of microorganisms the temperature rises slowly and with the short supply of oxygen the anaerobic condition will set in and carbon dioxide will be more. If such condition is obtained in the larger part of the pile the quality of the dry matter will be affected. The oxygen concentration in the heap has a great influence on the liberation and fixation of ammonia. The optimum moisture content at which the mycelium grows best is 68-70 per cent. If the compost is very dry (less than 60 per cent) at spawning the mycelium growth is very thin.
The interval between the turns is also important and is governed by the nature of the material. The object is to turn as soon as there is a risk of an anaerobic area development. The length of the composting period is very important although the determination of the length is an art. The experienced grower considers the composting is complete when the manure has a dark colour and when the tensile strength of the straw in the manure is low (indicating that the straw can absorb and retain water).
For a lay person the compost is ready when it has the following qualities:
(a) The heap should have a light brown appearance.
(b) The straw should be neither too long nor too short.
(c) The heap should have lost the smell of ammonia and have a rich mushroom aroma.
(d) When squeezed tightly in the hand the moisture should be released in the form of only a little dampness and the compost fragments should only just bind together.
The quality of a mushroom compost depends on:
(a) The nature and quality of the basic material.
(b) Organic and inorganic supplements.
(c) The management of the compost during the composting period.
SPAWN AND METHODS OF SPAWNING
Spawn is the mushroom seed, comparable to the vegetative seed in crop plants. It is merely the vegetative mycelium from a selected mushroom grown in a convenient medium and the particular strain of mushroom selected, decides the type of mushroom the spawn would produce. The success of mushroom cultivation and its yield depend to a large extent on the purity and qualityof the spawn used. In the seventeenth century when mushroom growing started, mushroom growers used to plant horse manure beds with horse droppings containing living mycelium which they called "spawn". Given here are some of the many improvements that have been done in spawn making from time to time.
Virgin Spawn: When the spores of the mushroom fungus fall on suitable substrate and the environment is also suitable, they germinate and form a mat of mycelium. This is dug out and used as spawn, and is known as "Virgin spawn". This type of spawn was used in France and exported to other countries.
Flake Spawn: When the beds are fully covered with mycelium before a crop of mushroom appears, the compost is collected, broken, dried and used fresh to inoculate other new beds. This type of spawn is called flake spawn.
Brick Spawn: A mass consisting of horse and cow dung manure and loam is mixed with water, tapped out in a layer two inches thick and cut into pieces when half dry. These pieces are then inoculated with the old spawn by making a hole in each, and after the spawn grows through the entire piece, it is dried and sold as brick spawn. Mycelium from tissue cultures is inoculated into the bricks and thus a vastly improved laboratory type of brick spawn is prepared.
The inoculum for the aforementioned spawns were prepared by inoculating specially prepared bottles of sterilised horse manure, tobacco stem or other medium with the germinated spores of the mushroom. However, these spawns are not in use at present.
Grain Spawn: Another type of spawn that has been developed is, spawn using grain (wheat or rye) as a base. The grain spawn is now almost universally used. The larger grains carry a greater reserve of food material per grain for mushroom mycelium so the spawn prepared with larger grains can withstand adverse conditions such as poor composting, etc. The small grains provide more points of inoculum per gram of spawn, so the spawn prepared with smaller grains will cover the compost sooner.
Different workers reported different grains for making grain spawn. Stoller preferred rye grain to sorghum for avoiding sectoring and advised the use of 6 g of gypsum and 1.5 g chalk per pound of grain to avoid the clumping of grains. Stoller got a faster growth of mycelium on hulled grain and cotton seed meal while buck wheat and wheat bran showed poor growth. San Antonio advised that cereal grain can be the only common substrate for commercial spawn production. Munjal recommended the use of jowar grain for the preparation of Agaricus bisporus spawn. Kumar reported that jowar gave better growth of mycelium after mixing 2 per cent gypsum and 6 per cent CaCO3 with the boiled grain by weight. Hu, used shell powder, starch, compost powder and grain hull powder for making granular spawn in Taiwan.
ADVANTAGES OF GRAIN SPAWN
(a) It is easier to plant than manure spawn, especially in the tray system where for spawning it can be scattered over the surface without unstacking and restacking the tray. Thus, labour is saved. With the standard shelves system, it is usually planted in the compost because of the quicker drying out of the compost surface layer as compared with the tray system of growing.
(b) Grain spawn run is faster and growers can save a few days for starting production.
DISADVANTAGES OF GRAIN SPAWN
(a) Due to its susceptibility to green moulds, the beds cannot be spawned at, as high a temperature as with manure spawn.
(b) It does not ship well and cannot be kept by the growers once it has been removed from the culture container.
(c) Grain spawn cannot be kept for any length of time in cold storage.
(d) Rats and mice dig up the beds to get the grain.
(e) It is not as resistant to adverse conditions as are the other types.
METHODS OF PREPARATION OF GRAIN SPAWN
Agaricus bisporus
Sorghum, wheat or bajra grain can be used for making spawn. The grain should not be very old, or broken, insecticide or fungicide treated or insect damaged. The grain is boiled with an equal volume of water till the water dries out. The grain should become soft but it should not get split or allow the starch to ooze out. If there is excess of water it should be drained off. The grain should be spread over alkathene sheets and left for some time then mixed horoughly with calcium carbonate @ 8 per cent by the grain weight. The mixture is filled in a wide mouthed bottle, plugged tightly and sterilised for two consecutive days at 15 lbs p.s.i. for half an hour. Calcium carbonate absorbs excess of water and thus helps in keeping the grain separate. It also helps to maintain the pH. After 2 days of sterilisation the bottles are inoculated with the culture of mushroom and incubated at 25 ± 1°C for 3 weeks. By this time, the grains become covered with white mycelium. The combination of 2 per cent gypsum and 6 per cent lime by grain weight gives the best results in the process of making grain spawn for Agaricus bisporus.
Volvariella volvacea
The spawn of paddy straw mushroom can be prepared in a way similar to that of Agaricus bisporus. The spawn can be prepared on paddy straw also. In this case paddy straw is cut into pieces of 4 to 6 cm and soaked in water overnight. The straw should be completely dipped in water. Excess water is drained off and 10 per cent of arhar dal powder or gram dal powder is mixed by weight of wet straw. Three-fourth of the bottles are filled with the mixture, plugged tightly and sterilised for two consecutive days at 15 lbs p.s.i. for half an hour, inoculated with the Volvariella culture and incubated at 32 ± 2°C for 10 days. The mycelium spreads in fortnight and bright coloured chlamydospores start appearing.
The highly desirable qualities for selecting good mushroom spawn are as follows:
(i) High yielding capacity: A good strain must be selected for the purpose. The strains are isolated either from the mushroom tissue, preferably from the junction of the stipe with the pileus or from the spores. In either case, the fruit body itself should have the desirable characteristics and must be taken from the first or second flush. A strain with silky creeping growth is considered better than that with a fluffy growth or the culture in which the sectoring does not occur. lt is found that the master cultures lose their viability after sometime and hence need to be checked and stored in a refrigerator (below 4°C). It is also useful to transfer the master culture on different media, so that the nutritional deficiency of the media can be made up. In the case of Volvariella the mycelial growth is more profuse and small brick-coloured knots (chlamydospores) appear afterwards. It has been observed that the more the number of knots the higher is the yield. The substrate on which spawn is made also affects production.
(ii) The medium should be well covered with a heavy growth of spawn.
(iii) The spawn should be free from mould contamination.
(iv) The spawn should be of a well-selected strain that has been thoroughly tested.
FACTORS DETERMINING THE AMOUNT OF SPAWN NEEDED
The amount of spawn used should be sufficient to help rapid and vigorous coverage of the beds with the organism. It must be sufficient, to fight successfully against any other organism that are always present in manure and to overcome any slightly adverse conditions of moisture or consistency that are present. The amount of inoculum which an individual spawn piece will give depends on the exposed surface that comes in contact with the manure. When conditions are ideal in the beds, less spawn is needed. It is up to the grower to decide the amount of spawn needed within the foregoing limits. A good inoculation of spawn is protection against adverse conditions.
METHOD OF SPAWNING
Methods of spawning are known to affect the yield of mushrooms
1. Double layer spawning: In this, spawning is done by scattering the spawn on tray beds when half-filled with compost and then after the complete filling of the tray. The spawn is gently pressed with the forefinger uniformly each time and trays are covered with newspaper sheets.
2. Top spawning: After filling the trays up to the brim with compost, the spawn is planted just above the surface and then a thin layer of compost is spread out because if the spawn is at the top of the compost it dries up quickly. If one is certain that the top will not dry out it will not be necessary to plant the spawn deep, if the compost is wet it is advisable not to go deep.
3. Through spawning: The whole of the spawn grain or shredded manure spawn are mixed throughout the compost.
4. Shake-up spawning: A few workers have reported a better yield by shake-up spawning. After one week of spawning the compost is thoroughly shaken up, and replaced in the shelves or in trays. After that either it is cased at once or a few days later.
5. Active mycelium spawning: This method has been developed in Germany. In this case fully run trays of spawned compost are used for spawning further trays. Thus one such tray is used for several trays. In this method, however, chances of contamination are more.
6. Spot spawning: The grain spawn can be put in the holes at a certain distance with a pointed stick or fingers. It is immaterial how the hole is made but care should be taken to ensure close contact of the inoculum with the surrounding compost to ensure a quick development of the mycelial strands. The cavity is covered with the compost.
7. Super spawning: Fresh pasteurised trays are planted as usual. This is referred to as preliminary spawning. After two weeks the compost from each tray is mixed with the compost from newly pasteurised trays and is packed firmly. This is known as super spawning.
Spawning the beds is of major importance, for all previous preparations, however carefully carried out, may represent capital and time lost, if the operation is done carelessly. Rasmussen while comparing top spawning, shake up and super spawning found that the lowest yield was obtained from top spawning and the highest yield was obtained from the super spawning method. Flegg, reported that there was not much difference in yield with regard to the method of spawning whether it was spot, surface, active mycelium or shake up spawning but there was a tendency for through spawning to give better yield.
Under Indian conditions Shandilya, tried spot, surface, through, spawn to spawn, shake-up and double-layer spawning and found that the through spawning method gave the highest yield followed by double-layer spawning. They also reported that spawn to spawn and shake-up spawning encouraged the development of competitive moulds and thus lead to reduction in yield. They got a better yield when the spawn run compost was added to the casing layer at the casing time and the pin head formation stage appeared within 9 days.
STORAGE OF SPAWN
Different workers have different views regarding the storage of spawn. It is observed that the storage condition of spawn also affects its productivity. The productivity of spawn is reduced by 5, 6 and 8 per cent if the spawn is kept at 2°C for 68, 128 and 206 days respectively as reported by Heltay in the case of manure spawn. Stoller observed that spawn taken directly from the growing room grew faster than spawn kept at 2°C. Lemke reported that cream and white strains give different reactions regarding the storage of wheat grain spawn. Sengbusch could store the spawn of the cream variety for months at 20°C and white strains could be continued for 4 to 6 months storage at the same temperature. San Antonio did not observe any reduction in yield of spawn of any variety, i.e., brown, cream or white, due to storage for 2 years.
The yield of Pleurotus sajor caju was almost the same from spawn kept for 2 months either at room temperature or in the refrigerator. The spawn kept in the refrigerator for 4 months did produce mushrooms, but the yield was less as compared to fresh spawn or spawn stored for a period of 2 months. Heltay and Barber also reported that spawn stored in the refrigerator (-2°C) for 2 to 4 months reduced the productivity of mushroom.
Arrangement of trays: (Figs. 2) when the compost is ready it is filled in wooden trays of convenient size having four pegs on four corners, or it can be put on shelves. Spawning is done by any method described before. Spawned trays are covered with paper and are stacked one above the other as shown in Fig. 2, Room temperature should be maintained at 22 to 25°C during the spawn run. Watering if necessary, should be done by spraying water on the paper. Spawn run takes 10 to 15 days (Fig. 2).
CASING
Casing means covering the compost with a thin layer of soil or soil-like material after the spawn has spread in the compost (spawn run). Casing is done for the following reasons:
1. It gives support to the mushroom. Though mushroom forms in the uncased compost, it can fall due to its weight and the supply of food can be disrupted.
2. Casing soil provides humidity as it can hold water for a longer period.
3. It prevents quick drying of the spawned compost and therefore, it helps better spawn growth.
4. Vegetative mycelium is encouraged to fruit only when it enters into the medium which is deficient in nutrition. Casing soil provides such conditions.
5. Casing regulates the temperature. Sudden reduction of temperature also encourages fruiting, soil loses moisture by evapouration and after each watering a cool layer is provided which appear to shock the warmth loving mycelium into activity.
According to Atkins, the ideal casing material should have the following attributes:
- It should have good water holding capacity, otherwise water will go straight to the compost and the surface of the compost will become waterlogged and will cause damage to the spawn. It should absorb water quickly and should release it slowly.
- It should have good aeration capacity, i.e., it should be quite porous so that exchange of gases can take place easily.
- Its texture should not be altered by watering.
- It should be neutral in reaction.
- It should be free from disease organisms, insects and
- undecomposed vegetable matter.
The French were the first to find that it is essential to cover compost with casing layer so as to induce a change in Agaricus bisporus from the vegetative phase to the reproductive phase. It is universally accepted now that for successful cropping, mushroom beds should be covered with a thin layer of casing soil. It is the belief of many workers that casing soil does not provide any nutrition but is valuable for its physical and chemical charcteristics. Structure and moisture holding properties are the primary physical factors influencing the yield and pH is the most critical chemical factor.
In France, powdered lime stone of the rock was used as casing material. Subsequently soil became the common casing material. Many countries are using sphagnum peat as casing material.
Soil has been the universal casing material. Lambert found that heavy soil yielded better than sandy soil; clay, loam or even clay is also preferable when the physical conditions are such that they do not puddle or cake on the bed, it is a belief that casing soil of compact structure is unsuitable because it hampers the passage of air from compost to casing and vice versa, giving too high a concentration of carbon dioxide during fructification. Repeated watering throughout the cropping leads to even greater compactness and CO2 concentration. Due to lack of free diffusion, the CO2 concentration increases considerably thus affecting the yield adversely.
Lambert believed that clay soil is better than sandy soil provided, there is humus in it so that such soil does not pan too much during cultivation. If humus is lacking, the surface of casing soil is scratched at the end of the vegetative phase thus good flushes of mushroom may be obtained. Scratching of the top layer of casing soil provides better holding capacity. Steineck reported that a compact structure gives a better yield if the upper casing layer has a. more airy structure. Stoller stated that compressed soil can hold more water and provides better contact with the compost layer. He found that pressing gave bigger, stouter and more solid mushrooms. Edward found that the greater the number of pores in the soil, the better the diffusion and when more water was applied to the soil before casing, they found the yield was better. Lambert concluded that heavy clayish soil yielded better than lighter sandy soil.
Rao found that equal parts of sand and peat as a casing mixture gives heavier fruiting. Last mentioned a casing mixture of loam, rotten dung and leaf manure to be applied immediately after spawning. In England, charcoal, sand, limestone, finely broken bricks and coarse washed ash were successfully used as a casing material. However, the additon of soil to the foresaid material gave increase in yield.
Now a days, actively growing spawned compost is mixed with the casing mixture and is believed that in such cases the fruiting is early.
In India, a number of mixtures have been recommended : (1) Well-rotten cow dung, mixed with light soil in the ratio of 3:1; (2) soil and sand ratio of 1:1; (3) farmyard manure and gravel ratio 4:1; (4) farmyard manure and loam ratio 1:1; (5) soil peat mixture 2:1; (6) spent compost, sand and slaked lime (4:1:1) and nematicide mixture stacked in a pile (1.20 M Ã- 1.0 M) in a shaded place and given 4 monthly turning. In case, the spent compost is pasteurised it is also treated with nematicide. The whole thing is decomposed within a year to a peaty black soil, which provides a good casing material. Kleermaker concluded that pH is more important than good structure of the soil and water holding capacity. Lambert concluded that neutral soil (pH 7) gave better yield than excessively acidic or alkaline soil. Some workers on the other hand noticed that pH of the casing soil between 8.0 and 8.5 are the most suitable for mushroom yield. Some reported that pH between 5.5 and 8.0 is suitable.The common practice among the growers is to adjust the pH between 7.0 and 7.5. The addition of lime to the casing mixture has an immediate effect of pH. It is also beneficial for the crop. Carbonate of lime or lime stone has been found to be the safest. Calcium has also been found to play an important role in fruit body formation. Bohus said that casing material must also contain calcium.
Eger was the first to suggest that stimulus provided by the casing layer for sporophore formation is accelerated in the presence of microorganisms. Pseudomonas putida was found to be active in promoting the fruiting in Agaricus bisporus. The activity of P. putida in casing soil is the result of environment created by the growing mycelium in the compost. It is suggested that P. putida releases iron which stimulates fructification. It was also found that there is a substantial increase in the number of pin heads and also fruit bodies by applying Ferrous salt to the casing soil. Flegg suggested that Manganese also increases the yield.
STERILISATION OF CASING SOIL
Soil contains many microorganisms. To use it as a casing material it should be sterilised in such a way that harmful micro-organisms are killed and the useful ones remain. Sterilisation of the casing material is done either by chemicals or by heating. Sterilisation may also be done by steam from boiler through perforated pipes and temperature raised to 60°C and maintained for 5 hours. Sterilisation under pressure is not advisable as the beneficial microorganisms are also killed and leave the soil more susceptible to re-infection.
CHEMICAL STERILISATION
Chemicals which are commonly used for sterilisation are formalin, chloropicrin, methyl bromide and vapam. For sterilisation with formalin, about half a litre of formalin is diluted with 10 litres of water and used for 1 cubic metre of casing soil. The casing soil is spread over a plastic sheet and treated with formalin. The treated soil is piled up in a heap and covered with another plastic sheet for 48 hours. Later, the soil is uncovered and stirred frequently to remove the formalin fumes. This soil is fit for casing after about a week when it is free from the smell of formalin.
TIME OF CASING
The time of application of casing is a controversial point. It may vary from 10 days to 3 weeks depending upon the spawning technique. Rasmussen indicated that early casing is successful but then watering, temperature and ventilation should be optimum during the prefruiting period for good results. Tschierpe, mentioned that yield is reduced if casing is done too early or too late. When one should case is a difficult question to answer. Some believe that casing the bed as soon as one notices the spawn run properly, minimises the risks due to infection of the compost by airborne spores of moulds or other fungi as well as by the pests such as mushroom flies which burrow into the compost to lay their eggs.
Casing should be evenly done, otherwise where the casing soil is thin, mycelium will come up and stroma will be formed which will hinder pin formation. With uneven casing, watering will also be not uniform.
Thickness of the casing: 1 to 1.5" is found to be the most suitable thickness for the casing.
CROPPING AND HARVESTING
Once spawn runned trays are covered with casing soil, the crop can be expected after 5 to 20 days. A fine spray of water should be given over the casing soil to maintain 70 to 80 per cent humidity. It is essential that fresh air should circulate over and around the boxes or tiers so that there should not be any pocket of carbon dioxide. Excessive humidity during the cropping will result in heavy concentration of carbon dioxide.The more the volume of mushrooms grown in a room the more will be the need of fresh air, as more carbon dioxide will be formed.
The greater the humidity and higher the temperature, the more are the chances of pests and diseases. It is, therefore, essential to keep the temperature low between 14 and 16°C. Apart from regular spraying of insecticides between flushes, efforts should be made to keep the circulation of fresh air around the beds. There should not be any unpleasant smell upon entering the mushroom house. The floor and walls should be frequently damped during warm weather which will prevent quick evapouration from the casing.
Mushrooms mostly appear in, "Flushes" and at temperature of 68°F (15°C) it generally takes 7 to 8 days to come to the button stage from the first appearance of the formation of a pin head. There is an interval of 8 to 10 days between the flushes. The humidity of the mushroom house will determine whether there is any need of watering the bed. If the atmosphere is dry then frequent watering is essential. While watering, it is necessary to give a gentle spray with a fine jet, otherwise the casing soil will get disturbed, panning of the surface will occur and the oxygen supply will be cut off.
After a few flushes one will find that the mushrooms are becoming lighter. This shows that the nutrients of the compost are getting exhausted. Though the mushrooms will be appearing in the beds there will not be heavy flushes later on. Therefore, a six-week crop is considered to be economical. When mushrooms have reached from the pin head to the button stage the question arises when the mushrooms should be plucked. It is a tricky question which is being asked by mushroom growers. There are no fixed days, stages or shapes of the mushroom. For the information of a lay person, however, the mushroom should be plucked when the cap is still tight over a short stem, or in other words, before the breaking of the veil. If the veil breaks then the colour of the gills will change to brown due to the formation of spores. The mushrooms will become leathery and will not be liked by the customer. It is also not advisable to pick very small mushrooms as in that case the weight of the individual mushroom will be less, and hence the yield will be low.
Mushrooms are plucked by twisting the mushrooms gently clockwise and anticlock-wise and afterwards it is pulled up very softly. Along with the mushrooms, soil particles of the casing soil also come up clinging with the mycelial threads of the mushroom. The lower portion of the stipe is cut with a sharp knife and is put in the trash box. The cleaned mushrooms are collected in another box. If there are many pin heads around the mushroom which are to be plucked, then it is advisable to cut that mushroom with a sharp-edged knife, so that the nearby pins do not get disturbed. Otherwise those pin heads will not grow into buttons, and will turn yellow. Finally, many saprophytes may attack those dead pin heads and disease will spread. When all the mushroom of the desired size have been picked up, the next stage is to fill up the holes with a mixture of sterilised casing soil. The surface of the beds should be kept quite levelled and where new casing has been put this should be made firm by giving a gentle pat.
After picking and filling the holes the path of the mushroom house should be cleaned, before watering the trays. It is always advisable to water the trays after picking the mushrooms. If watering is done before plucking then the soil particle of the casing will stick to the cap of the mushroom and will spoil the whiteness of the mushroom.
The duration of cropping varies with circumstances. With the tray system a period of 6 to 7 weeks and in the case of the shelf system it varies between 6 and 12 weeks. Every grower should keep detailed cropping figures and periodically analyse them to determine the economic duration of his farm.
If there is an outbreak of disease and it is not controlled by the recommended treatment it is advisable to remove the diseased tray. The mushroom should be plucked very carefully and gently. All the processes from plucking to packing of the mushrooms should be done gently, otherwise bruises will occur on the cap of the mushroom and reduce its market value.
DISEASES
Mushrooms are subject to many fungal, bacterial and viral disease. Even a little carelessness in different steps during cultivation can play havoc with the mushroom. Improper pasteurisation of compost and casing soil can be the major source of diseases. Once the disease is introduced in the farm the secondary infection can be carried out by different agencies, such as air, water, machines and workers, the important fungal, bacterial and viral diseases with symptoms, causal organisms and control are described as follows:
Soft Mildew or Cobweb (Dactylium dendroides)
A fluffy, white, cobweb-like mould grows over the surface of the casing soil. Initially it is white but later changes to pink with age. This fungus attacks mushrooms which appear like white cottony balls on the surface but are totally rotten inside.
The chief sources of infection are soil, air, wet surface, high humidity and butts of mushrooms left in the cropping trays.
Control: Good ventilation and prevention of excess of humidity checks the disease. Individual patches are treated with 0.2 per cent dithane Z-78. They can also be covered with PCNB (penta chloro nitro benzene). In addition, the mushroom house must be disinfected with formalin before putting the trays in the room for the next season.
Brown plaster mould (Papulospora byssina)
It occurs on spawned and cropping trays. First it is white with a cloudy appearance, later the colour changes to brown. This fungus spreads very fast and causes heavy reduction in yield. Originally the fungus is present in the compost. Too wet compost, high temperature (28 to 32°C) during spawn run and cropping at more than 18°C encourages infection.
Control: Properly prepared compost, proper watering, maintaining suitable temperature during the spawn run and cropping, and 2 per cent formalin spray can also control the disease.
White plaster mould (Scopulariopsis fumicola)
It closely resembles brown plaster mould intially but later on from white it changes to a delicate pink shade. If compost making is improper then this fungus covers the whole tray and thus reduces the yield. Too much water in the compost during composting or an anaerobic peak heat are the main contributory factors for the growth of this fungus. Inoculum is carried by pests or air.
Olive green mould (Chaetomium olivacearum)
This fungus appears in the compost or spawned bed beforecasing. Initially it is white but afterwards changes to an olive green colour.
Improper pasteurisation of the compost, inadequate ventilation and too wet compost are the source of this disease.
Control: Sufficient air should be introduced without increasing the temperature above 60°C during pasteurisation. Spraying of trays with 0.2 per cent thiram and captan or 0.05 per cent benlate can check the spread.
Inky cap (Coprinus lagopus and C. comatus)
The disease can be detected by the appearance of a long slender stalk with a small thin cap which is auto-deliquescent and dissolves into black inky liquid. The appearance of the fungus shows the presence of ammonia in the compost.
Control: Before filling the trays the compost should be free from ammonia, otherwise Coprinus spp. will appear and cease the yield of Agaricus bisporus. If the fruiting of Coprinus bodies is profuse in the spawned trays then the compost should be re-pasteurised at 60°C for two hours and then respawned and recased.
Green Mould (Trichoderma viride)
It appears as green patches on the spawned and cased trays. If this fungus attacks the spawned tray the spawn run is affected. If it appears on the casing soil it checks the pin formation of the mushroom. This fungus grows on decomposed organic matter and dead mushroom tissues. Improper pasteurisation of compost and high humidity are also responsible for the spread of this fungus. The spores of this fungus are carried away by air, water and careless handling.
Control: Spraying with 0.05 per cent benlate checks the disease.
Truffle disease (Pseudobalsamia microspora)
This disease is more prevalent in summer. The fruiting body of this fungus appears in mushroom beds as a round, cream coloured, wrinkled and convoluted surface, giving it a brain-like appearance, having characteristic small form in the bed and top of casing soil (resembling fused pinheads). These bodies on maturity turn reddish brown and release the spores. Lack of ventilation and high humidity are the main factors for the appearance of this disease. The only control measure is that spawn run temperature and the cropping bed temperature should not exceed 18°C with adequate ventilation. High humidity in the mushroom house should also be avoided to control the truffle fungus.
Bubble disease (Mycogone perniciosa)
When this fungus attacks the mushroom, it covers the mushroom with a dense white mat of mycelium leading to reduction in yield. In the early stage of its infection the mushroom has a swollen stalk and a disproportionately small cap. The casing soil may be the source of infection, but other agencies also can not be overlooked as the sources of infection such as unpasteurised compost, high humidity, etc. Temperature above 17°C are favourable for the development of the disease.
Control: The diseased mushroom should be sterilised on the beds with 2 per cent formalin and should be promptly removed. The infected area may also be sprayed with 0.2 per cent dithane Z-78, and benlate 0.05 per cent. Benlate may be mixed in casing soil also.
Dry Bubble, Brown Spot Disease (Verticillium malthousei or V. psiallistae)
This fungus causes light brown spots on the cap which coalesce and cover most of the area of the cap resulting in irregular patches. In severe infection the mushroom becomes distorted. The cap shrinks and the affected mushroom becomes leathery. The primary source of infection is the casing soil. Control of high temperature during cropping and proper ventilation is advisable for the control of the disease, 0.2 per cent dithane Z-78 spraying three times, at the time of casing, pin head formation and after two flushes of the crop, is effective.
Bacterial Blotch (Pseudomonas tolaassi)
This bacterial disease causes brown, slightly sunken blotches on the mushroom cap. These spots are irregular, yellowish to dark brown and coalesce in the later stage.
The main source of infection is the casing soil. Infection spreads through water, flies, mites, nematodes, etc. The casing soil should be properly sterilised and ventilation should be quite adequate. Use of chlorinated water also reduces the disease incidence. Before the pin formation, preventive spray with 9 mg/ft of terramycin on the beds is advisable. Spraying in between the flushes is also quite effective if the disease persists.
VIRUS DISEASES
None of the virus diseases is reported from India but there are reports from other countries. Various names like La France. Brown disease and watery stipe, X disease, and dieback disease were given according to the symptoms observed. Under dry conditions diseased mushrooms are shrivelled, leathery and brown in colour. Under humid conditions the stipe becomes watery and grey. Sometimes an abnormal elongation of the stipe with tilted pileus (drum stick) are noticed. Delayed appearance of pin heads, and early maturity of sporophore are also the symptoms of the virus disease. Virus infection may even be symptomless. It has been observed that the cream and off-white variety of mushrooms usually suffer less damage than the pure white variety.
Six viruses have been isolated from the diseased mushrooms. Five of them are polyhedral having particles 19, 25, 29, 35 and 50 nm in diameter, and one is bacilliform particle 19 Ã- 50 nm. They can occur singly or in combinations. It is difficult to associate any particular type of virus with any specific symptom. Transmission of virus through phorid larvae and Tarsonemus mites are reported by Hussay. Transmission through mushroom spores and through mushroom spawn are reported by Nair. Certain species of field mushroom, e.g., Laccaria laccata have been suspected as natural reservoirs of mushroom viruses.
Control
Zaayen suggested the following control measures:
1. Heat the growing room, along with trays and compost at 70°C for 12 hours at the end of the crop.
2. Treat the trays and other equipment with 4 per cent sodium pentachlorophenate, 0.5-1 per cent soda (Na2CO3) solution.
3. Disinfect the doors, floor, and walls etc., with 4 per cent formaldehyde solution. Strict hygiene should be observed at the mushroom farm to eliminate the virus disease to some extent.
INSECT PESTS
Mushrooms are also attacked by insect pests. It is better to prevent the entry of these. Once mushrooms are infested with insects it is difficult to control them. Spring tails, phorids flies, sciarid flies, mites and nematodes and small larvae of mushroom flies bore the fruiting bodies and cause rotting. Some pests cause damage to the spawn and hence lead to reduction in yield. They lay eggs and the larvae feed on the compost, eat away the mycelium and burrow into the stalk of the mushroom. The mature larvae are easily recognised by their black head and elongated shape.
Sciarids
These flies are dark in colour and have slender bodies with long antennae. Flies themselves cause little harm to the mushroom bed, but its larvae are more harmful. These flies lay eggs in the bed and the larvae that hatch out, feed on the compost and burrow into the base of the stalk right through to the cap. Sometimes the flies lay eggs on the cap and the larvae tunnel down into the mushroom, making funnel-shaped cavities. Larvae are black in colour and 6 to 7 cm long and can be recogonised by their black head and elongated shape. Common are: Lycorella fenestralis, Neosciara pauciseta, Sciara carpophilla, S. multiseta, S. agaria.
Phorids
These have short antennae and wing venation. In early summer and late autumn much damage is done by the larvae of these insects which can be distinguished by the lack of a distinct black head. Their front end is tapered. Phorids cause much damage to the mycelium but sometimes they make tunnels into the mushroom. These flies are quite active during the early hours of day. The common varieties are: Megaselia nigra, M. agrici, M. bovistra, M. flavinervis and M. halternata.
Spring tails
These are quite tiny and cannot be seen with the naked eye. These have stout antennae. They can crawl with speed, but they move by springing several inches into the air. When they are in a mass they look like gun powder on beds. They mostly feed on the mycelium and may sometimes attack the stalks and caps also. Common among them are: Lepidocyrtus cyaneus, L lanuginosus, Achorutes armatus, Isotoma simplex, Prerstoma minuta, Xenylla sp.
Cecid
These are tiny orange black flies, which are seen rarely, but their presence is indicated by the appearance of very small larvae, which are smaller than those of phorids and sciarids. They are pinkish yellow, orange or white, pointed at both ends and very often have a dark "anchor" like structure in the neck. They eat the mycelium but mostly make their way into the stalk and gills. Common among them are: Heteropeza xygmaea, Myophila spyeri, M. barnesi, Lestremia Cinerea.
Mites
These are found in the mushroom house. They do not cause damage to the mushroom but are the carrier of the inoculum. They eat the mycelium and also make holes in the mushroom caps and stalks, and sometimes they chew the mycelial strands around the bases of the stalks. Rhizoglyphus, Phylloxerea, Tyrophagus lintneri, T. putrescentiae, T. longior, Histiostoma gracilipes, Pygmephorus americanus, Tarsonemus floricolus, Linopodes antennaepes are commonly found.
Nematodes
The faulty method of compost making and casing soil are the main cause of the occurrence of nematodes. There are three types of nematodes found in the mushroom beds. The parasitic nematodes have a spike-like structure called stylet. The nematodes project the stylet, punctures the mycelium and sucks its contents. They puncture the mycelium at several points and thus the mycelium start disappearing. The compost becomes sodden. Nematodes also feed on the mushroom, turning them brown, watery and stunted. In this group belongs, Ditylenchus mycelophagus and Aphelenchoides composticola, A. aesterocaudatus.
The other category of nematodes possess a tubular mouth. They feed on bacteria in the compost by sucking liquid and organic matter. The nematode excretes waste material which are toxic to the mushroom mycelium and when the nematode population becomes too high the mycelium is killed due to high toxicity. In addition, the nematodes are also carriers of phathogenic bacteria (Pseudomonas tolaassi).
Control
1. Dust lindane (0.65 per cent) 80 g/quintal of straw to be mixed at the 7th turn during compost preparation.
2. Spraying the spawned trays with 7 ml melathion (50 per cent E.C.) in 10 litres of water 2 days after spawning and 2 days before casing.
3. Add 40 ml of nemagon in 10 litres of water at the time of the second turn per 300 kg of wheat straw compost for nematodes.
4. Spray the trays with 5 ml of nuvan (100 of E.C.) in 10 litres of water during spawn run and 2 ml in 10 litres of water during cropping.
5. Cultural practices.
Fungicides for Mushroom Diseases
| Common name |
Trade name (and manufacturer) |
Method and rate of use |
Fungi controlled |
| Benomyl* |
Benlate (Du Pont) |
Mix with casing or apply in place of first watering Mix 240 g/100m2 (0.5 lb/1000ft2) Drench 240 g/200 litres/100 m2 (0.5 lb/40 gall/1000 ft2) |
Dactylium, Mycogone, Trichoderma, Verticillium |
| Carbendazim* |
Bavistin (BASF) |
Mix with casing or apply in place of first watering. Mix 250 g/100 m2 (8 fl oz/ 1000 ft2) Drench 250 ml/200 litres/100m2 (8 fl oz/40 gal/1000/ft2) |
Dactylium, Mycogone, Trichoderma, Verticillium |
| |
Bavistin Flowable (BASF) |
Use as for Bavistin. Mix 250 ml/100m2 (8 ft oz/1000 ft2 Drench 250 ml/200 litres/100 m2 (8 fl oz/40 gal/1000 ft2) |
|
| Chlorothaloni |
Bravo 500 (SDS Biotech) |
Apply as a spray 1 week after casing and repeat if necessary not less than 2 weeks later |
Mycogone, Verticillium |
| |
Repulse (Midox) |
Rate 220 ml in 100-200 litres/100 m2 (7 fl oz/20-40 gal/100 yd2) |
|
| Prochloraz manganese |
Sporgon (FBC) |
Used as either a single, double or triple application. Single: 7-9 days after casing, 300 g/100 litre/100 m2 (10 oz/20-25 gal/1000 ft2) Double : 7-9 days after casing and between second and third flushes, 113 g/100 litre/100m2 (4 oz/20-25 gal/1000 ft2) Triple : 7-9 days after casing and after first and third flushes, 57 g/100 litres/100 m2 (2 oz/20-25 gal/1000 ft2) |
Dactylium, Mycogone Verticillium |
| Thiabenzazole* |
Hymush (Agrichem Ltd) |
Mix into casing or apply as spray. Mix 180-250 g (6.5-8.5 oz)/200 litre (45 gal) When disease is serious, supplement above with 90g (3 oz)/100 m2/200 litre between flushes or: No initial treatment but weekly applications of 150 g (4 oz)/200 litres/100m*) NB: Maximum amount to be used is 750 g (24 oz)/100 m2 to any one crop. A single initial dose should not exceed 250 g (8 oz) and supplementary does 120g (4 oz)/100m2. |
Dactylium, Mycogone, Verticillium |
| |
Tecto Flowable (Merck, Sharp & Dohme) |
Used as for Hymush |
Mycogone, Verticillium |
| Zineb |
Zineb 7% Dust (Hortag) |
Occasional treatment after casing and between breaks. Rate, 250 g/100m2 (12 oz/1000 ft2) or, applied every week after casing throughout cropping and before watering 140 g/100 m2 (4.5 oz/1000 ft2) |
Dactylium, Mycogone, Fled geotrichum, Verticillium |
| |
Zineb Wettable (Hortag) |
After casing and between flushes, 1 kg/1000 litres at rate of 5 litres/10 m2 (1 lb/100 gal at rate of 1 gal/100 ft2) |
Dactylium, Mycogone |
| |
Tritoftorol (Bos Chemicals) |
Between flushes, 5 kg/100 m2 at 4.5 litres/4.6 m2 (0.5 lb/100 gal at 1 gal/50 ft2) |
Dactylium, Mycogone |
* Benzimidazole fungicides
Insecticides for Mushroom Pests
| Common name |
Trade name |
Method and rate of use |
Organisms controlled |
| Diazinon (Ciba-Geigy) |
Basudin 5G Basudin 40 WP Diazitol liquid Basudin 5G |
Mix with compost at spawning 200 g/tonne (7 oz/ton) 25 g/tonne (1 oz/ton) 56 ml/tonne (2 fl oz/ton) 1 kg/tonne (36 oz/ton) |
Phorids* |
| |
Basudin 40 WP Diazitol liquid |
125 g/tonne (4.5 oz/ton) 278 ml/tonne (10 ft oz)/ton) If incorporated before peak-heat, double the above rates must be used |
Sciarids*†and decids* |
| Dischlorvos (Ciba-Geigy) |
Darmycel dichlorvos |
Aerial spray in spawn-running rooms 30 ml in 300 ml water/140m3 (1 fl oz in 0.5 pint water/5000 ft3) |
Phorids and sciarids†|
| Diflubenzuron (IC-Midox) |
Dimilin |
Mix with casing 120 g/tonne (4.5 oz/ton) Drench top cassing**) |
Sciarids |
| |
Dimilin |
4 g in 2.5 litres water/m2 (13.5 oz in 50 gal water/1000m2) |
Sciarids |
| Chlorfenvinphos (Ciba Geigy) |
Sapecron 24 EC Sapecron 10G |
Mix with compost at spawning 208 ml/tonne (7.5 oz/ton) 500 g/tonne (18 oz/ton) Mix with casing |
Sciarids*†and phorids |
| |
Sapecron 24 EC Sapecron 10G |
125 ml/tonne (4.5 oz/ton) 300 g/tonne (10.75 oz/ton) |
Sciarids*†|
| Malathion (Murphy) |
Malathion 60 |
Drench to casing 330 ml in 200 1 water/100 m2 (II fl oz in 40 gal water/1000 ft2) |
Sciarids†|
| Gamma-HCH (Octavius-Hunt) |
Fumite lindane pellets |
Aerial smoke during cropping Pellet size 3, treats 84 m3 (3000 ft3) |
Phorids and sciarids |
| Resmethrin/pyrethrins (Mitchell-Cotts) |
Pynosect 30 |
Aerial spray during cropping 30ml/100m2(1 fl oz/1000 ft2) |
Phorids and sciarids |
| Resmethrin (PBI) |
Turbair resmethrin extra |
Aerial spray during cropping 30 ml/100 m2 (1 fl oz/1000 ft2) |
Phorids and sciarids |
| Permethrin (ICI-Midox) (PBI) |
Ambushfog 2 Turbair permethrin |
Aerial application during cropping 100 ml/250 m3 (4.5 fl oz/10000 ft3) 30 ml/100 m3* (1 fl oz/1000 ft2) |
Phorids and sciarids |
| (Octavius-Hunt) |
Fumite permethrin smokes |
Canistre size 4000, treats 112m3 (4000 ft3) |
|
| Pirimiphosmethyl (ICI-Midox) |
Actellifog |
Aerial fog during cropping 70 ml/100m2 (2.25 fI oz/1000 ft2) |
Phorids and sciarids |
* Manufacturer's label recommendations differ from those quoted above
**These figures are based on a prepared casing weight of 1 tonne/30 m2 (3 tons/1000 ft2)
†Sciarid populations that are resistant to Qrganophosphorous insecticides will not be controlled with these chemicals.
ABNORMALITIES OF MUSHROOMS
Rose comb
In this case the cap is malformed and gills or lamella formed on its upper surface. On top of the cap of the mushroom appears a pink, waft-like outgrowth composed of a mass of irregular and ill-formed gills. The abnormality is caused by the use of mineral oils or their fumes in the mushroom house. Spraying of water without cleaning the spraying machine used for diesel oil or other mineral oil, use of oily water, frequent pesticidal spraying, use of coal or kerosene oil stove to heat the mushroom house are the causes of this. All the foregoing things should be avoided in the mushroom house. If one is using sawdust, or a kerosene oil stove for heating purposes one should be particular that the fumes of the oil gas should not circulate in the mushroom house.
Long stalked mushroom
Improper ventilation in the mushroom production room leads to the formation of long stalk and small cap.
Scaly and cracked mushroom
This deformity is due to draught or cold air or less humidity in the production room.
OPEN MUSHROOMS
Due to the high temperature of the production room, premature opening of the caps occur. This opening may be due to high concentration of carbon dioxide also.
Stroma
White mycelial growth on the casing soil which makes a compact structure of the mycelium hinders the pin formation of the mushroom. This is also due to less humidity and high concentration of carbon dioxide. It is advisable to re-case the trays.
PRESERVATION
Mushrooms, like fruits and vegetables, are highly perishable. They grow in flushes and every 8 to 10 days they are harvested in abundance. In between the flushes, the production comes down quite low. The demand never coincides with the supply, the day when there is good production the demand may be low and vice versa. To prevent such a glut in the fresh market, it is necessary to preserve them. Mushrooms require a great deal of attention during storage,-marketing and processing at the post harvest stage. Discolouration, weight and flavour loss are some of the problems.
Garmley reported that the mushrooms covered with a synthetic PVC film lose water and whiteness at a much slower rate than uncovered mushrooms. They suspected that the change in colour is due to loss in moisture. Mushrooms stored at 21°C remained whiter than those stored at 1°C or 11°C, but they mature at a much faster rate. The loss of whiteness during storage is a complex process. They found that the mushrooms stored at 21°C hardened at a faster rate than mushrooms stored at 11°C or 1°C. According to them, the chemical action plays a great role in the toughening process. Mushrooms stored at 21°C (RH 74-85) did not lose whiteness as quickly as those stored at 11°C (RH 50-60) or 1°C (RH 70-80). Toughening and the degree of maturity were greatest at 21°C. Different methods are given here to increase the shelf life of white button mushrooms.
Storage in Fresh Conditions
Mushrooms have a high rate of respiration and hence proper attention should be given during storage. In Western countries white button mushrooms are covered with PVC film and have a shelf-life of 5 to 7 days at 15 to 21°C temperature during transportation. Uncovered mushrooms have 2 to 4 days of shelf-life under similar conditions.
Mushrooms packed in fibre board trays (1.5 m Ã- 1.5 m Ã- 4 cm) covered with an inverted tray to reduce desiccation show a maximum shelf-life of 7 days when kept at 1°C for 5 days and 20°C for the next 2 days.
Vacuum cooling also helps in increasing the shelf-life. In this case mushrooms are packed in a film which is punctured to allow evapouration from the mushrooms. The punctured hole is covered with a small piece of sticking tape after vacuum cooling to stop the gas flow and to allow the overwrap to function properly.
Fresh mushrooms are packed in 0.02 to 0.03 mm dense polyethylene bags with nitrogen and can be stored well at 0°C up to 5 weeks, at 5°C up to 4 weeks and at 15°C up to 2 weeks.
In South India fresh mushrooms are sent to other places by packing in polythene bags and these are kept in paper lined bamboo baskets or in corrugated cardboard.
Controlled Atmosphere
Shelf life of fresh mushrooms is increased in a controlled atmosphere consisting of 9 per cent oxygen and 25 per cent carbon dioxide. Partial evacuation followed by flushing with carbon monoxide and storage at low temperature can also extend the storage-life up to 20 days.
Preservation by Gamma Radiation
Shelf life of mushroom can be increased up to 10 days by giving gamma radiation of 250 Krad dose and storing mushroom at 15°C.
Freeze Drying
It is done by immersing the sliced mushroom in a solution of 0.05 per cent sodium metabisulphate and 2 per cent salt for about 30 minutes. These are then blanched in boiling water for 2 minutes, followed by cooling. The product is frozen at - 22°F for one minute. The frozen mushrooms are dried to a moisture content of 3 per cent in a freeze drier and packed in cans under vacuum. In the second method after harvesting the mushrooms are pre-cooled to temperatures of 2 to 4°C. At the freezing plant they are sorted out, washed, and pre-treated. Chlorine levels as high as 50 ppm have been helpful in keeping the microbial load to a minimum since the frozen mushrooms are sold to reprocessors.
Some people blanch the mushrooms as is done for canning, and then keep it in deep freeze as it will retain its white colour for a longer period.
Steeping preservation
Edible mushrooms have been steeped in a solution of 2.5 per cent salt, 0.1 per cent ascorbic acid, 0.2 per cent critic acid, 0.1 per cent sodium bicarbonate and 0.1 per cent potassium metabisulphite to give organoleptically acceptable mushrooms with no microbial spoilage up to 10 days in storage.
Dehydration of Mushrooms
For dehydration purposes mushrooms are harvested at a mature stage. If the stalk is too big it is cut into small pieces. Mushrooms can be dried in the sun or in a mechanical dehydrator at 60 to 70°C. After complete drying the mushrooms are reduced to nearly one-tenth of their weight. Dried mushrooms should be stored in air-tight containers in a cool dry place. Dried mushrooms can also be ground into powder which can be used for making mushroom soup. The powder should be packed in an airtight container.
Mushrooms can also be dried after steam or water blanching and drying at 60 to 70°C. Dipping in aqueous solution of chlorine, following sulphiting is reported to give whiteness to the product. Dried mushrooms are hermetically sealed so that they retain their original colour and flavour for six to seven months during storage. These are better reconstituted by immersing in an aqueous solution of sugar and ascorbic acid.
Canning of Mushroom
Button mushrooms can be canned either whole, sliced or in smaller pieces. Canners prefer mushrooms to be picked at an early stage. Immediately before canning, the stalks are cut close to the button and the mushrooms showing any blemishes are rejected. Mushrooms used for canning purposes should be small buttons and of the same size, with 0.4 to 1.0 cm long stalk attached to the cap. Later, mushrooms are washed gently to remove any adhering soil. Blanching is necessary to control discolouration but this causes shrinkage. Shrinkage up to 30 to 35 per cent may be allowed. Rough handling of blanched mushrooms also causes increase in the shrinkage percentage. Fresh mushrooms are dipped in boiling water for 2 to 3 minutes and put in cold water to prevent leaching losses which are sometimes as high as 25 per cent or by immersing mushrooms in a boiling solution of 0.1 to 0.2 per cent citric acid for about 5 minutes and cooled immediately in cold water.
Blanched and cooled mushrooms are filled in cans leaving 1.25 cm space. Approximately 195 g mushrooms are filled in 1 lb jam cans. Brine solution consisting of 2 per cent common salt, 2 per cent sugar and 0.3 per cent citric acid is boiled, filtered through muslin cloth and added into the can to fill just up to the brim (125 ml solution for 1 lb jam can). After placing the lid on the can the mushrooms are exhausted by keeping them in boiling water till the centre temperature reaches 80 to 85°C. After placing the lids they are sealed on a seamer to get an airtight seam. The 1 lb cans are later steamed at 115°C (10 Ib/p. si) for 25 to 30 minutes. This time should be increased or decreased depending on the larger or smaller size of the can. Soon after sterilisation, the cans are kept in fresh water for cooling. Later, they are wiped dry and kept in a cool dry place.
According to Dang, canning of mushrooms can be improved if the fresh mushrooms are exposed to vacuum treatment by immersing in plain water or in a 2 per cent brine solution in a vacuum even before blanching. Before evacuation or breaking of vacuum, it is essential to press the floating mushroom below water level to achieve desired results. Grading practices can be employed by physical means to give a better look to the product. The main problem in the canning of mushroom is its browning. In Europe, to improve the colour of the product, blanching of mushrooms is often done in a citric acid solution. Ascorbic acid and EDTA (Ethylene Diamine Tetra Acetic) acid in the ratio of 1:10 is also sometimes used in covering brine. Immersing in sulphite solution of sulphur prior to blanching has also reported to improve the colour of the product.
An increase of 19 per cent in the weight of the canned product has been reported when the fresh mushrooms were stored for 72 hours at 12°C and 95 per cent RH. The increased weight was attributed to the greater water holding capacity of mushrooms that develops during storage. It was observed that an interaction existed between soaking and cold storage which was effective in increasing the yield of canned mushrooms.
Mushrooms are also preserved in the form of pickles and ketchup.
DO'S AND DON'TS OF MUSHROOM GROWING
1. Take full precautions while making the compost.There should not be any ammonia smell when the compost is ready.
2. The compost should not be too wet or too dry at the time of filling. If it is dry, then sprinkle water over the compost before filling the boxes.
3. The success of mushroom growing depends on the com-post.
4. Boxes should be filled up to the brim with the compost.
5. Spawn should be from a reliable source.
6. Do not use contaminated spawn.
7. After spawning cover the boxes with newspaper. Watering should be avoided during the spawn run. If watering is essential,spray water over the newspaper with a fine jet.
8. The casing soil should be properly sterilised. Don't sterilise the casing soil long before the use and store it for a longer period.
9. Casing soil should not be very fine otherwise there will not be a good gaseous exchange.
10. Before putting the casing over the spawn run compost, moisten it with water.
11. Cowdung used for the casing should be rotten and should be one year old.
12. Maintain the temperature of the room for 2 or 3 days at 22 to 24°C after casing and then lower the temperature to 14 to 18°C.
13. To keen the room humid and the temperature low, spray the walls and floor of the mushroom house with water.
14. If the weather is dry, hang moist gunny bags on the side of the trays and keep it moist or fill the gunny bags with saw dust and spray water over it to create humidity in the room.
15. If there is panning of the casing soil, rake the casing soil gently with a fork or with a pointed knife to provide the gas exchange.
16. If after raking there is no pinning, it is better to remove the whole casing soil and recase the bed.
17. If there is an appearance of disease in the box, treat the box immediately. If it does not respond to the treatment, remove the diseased tray immediately from the room.
18. Spray water gently, do not water the tray before picking.
19. After picking fill up the holes with sterilised casing soil and spray water.
20. For picking, if the mushroom is cut from the base then remove the remaining portion with the pointed knife. Don't leave it as such, otherwise other saprophytes and bacteria will attack it and will be the source of disease.
21. Keep the butts in one container and burn it or throw it in the pit far away from the mushroom house.
22. Never broom the mushroom house, dust and spores of micro-organisms will spread and will spoil the mushroom. Remove the dust by sweeping it gently with a duster.
23. Before entering the mushroom house, remove your shoes and put on the slippers kept separately in the mushroom house.
MUSHROOM FARM DESIGN
Earlier mushroom growing was done in hilly areas, but now with the advancement of technology it can be done at all elevation/places in India under controlled conditions with the specialised construction of mushroom houses.
In building a mushroom farm, there are number of initial considerations and in the fifties on that basis a standard plan was made, though with the advancement, the materials have been changed but the standard plans still remain the same.
Mushroom growing is an agricultural activity where the hygiene is the most important factor. In order to have reasonable income from mushroom farming, it should have at least six rooms, each with a cropping area of 200m2. While setting up a mushroom farm one should take further expansion into account.
After selection of the site the building should be planned, it should be near the wide road for delivery of raw material dispatch of mushroom and spent compost. It is important that the plot is serviced for water, sewage, electricity and possible also natural gas.
For farm designing care should be taken that in small piece of land different operations such as composting, spawn making, cropping and post-harvest technology should be done in the most efficient way at low cost.
For Button mushroom the infrastructure needed are (Fig. 7).
- Covered composting yard with guddy pit,
- Bulk/pasteurization chamber,
- Cropping rooms,
- Cold room,
- Casing soil pasteurization room,
- One boiler room,
- A/C handling room,
- Store
The foundation of the building should be on the firm ground. Water pipes, electrical cables and sewers are laid before the actual construction starts. The site should be away from the populated area. The composting yard is built nearer to the main road for operation convenience. The bulk chambers are built on the order side of the composting yard so that the distant end of the chamber opens nearer to the cropping rooms. The cropping rooms are built away from composting area for maintaining the cleanliness. The casing pasteurization chamber is also built away from composting yard on one side of the bulk chambers. Space for future expansion should be left at the beginning of planned mushroom farm. In short:
1. Composting yard should be accessible by road and away from cropping rooms.
2. Preferably, the bulk chamber should be in line and close to the composting yard.
3. Service rooms and machinery rooms have to be nearer to cropping rooms for greater efficiency.
4. Cropping rooms should be at the back of bulk chambers away from composting yard.
5. Extra space should be left for expansion of bulk chamber, compositing yard and cropping rooms.
6. Unit should be built where there is ample supply of water and power.
7. It should be preferably located outside the municipal limits.
To start with, one should have six growing rooms of 35' Ã- 25' Ã- 12', each room will have 20 tonnes of fresh compost. The size of the bulk chamber should match the capacity of the growing rooms. It is convenient and economical to have a bulk chamber of minimum 20 tonnes. Dimension of the bulk chamber should be 36' x 9' Ã- 12' giving 20 tonnes of compost at a time: A composting yard 60' Ã- 40' should also be constructed for preparation of compost. Such unit will yield between 90-100 tonnes of mushroom annually, if run on full capacity. One casing soil pasteurization room, one boiler room, one AC handling room and one store is also needed. The above bulk chamber should be 20-25m long, 10m wide with a height of about 4-4.5m, properly covered with iron galvanised iron sheet. Dutch mushroom farm design is widely used all over the world. There are two systems of growing, single-zone system and deuble zone system. In single-zone system all the operation, i.e., peak heating, spawn running and cropping is done in a single room. Double-zone system, the compost after phase I is filled into specially built chamber which is appropriately insulated and provided with steam connection and air blowing system. Rest of the operations are done in specially insulated separate rooms.
For Commercially Viable Unit, Total Infrastructure Required
| Facility |
Units |
Size |
Total area (Sq.ft.) |
| Cropping rooms |
12 |
35' Ã- 25' Ã- 12' |
10500 |
| Corridor in the |
|
|
1125 |
| growing rooms Office |
1 |
12' Ã- 12' Ã- 12' |
360 |
| (Production facility) |
|
|
|
| A/C handling room |
1 |
55' Ã- 15' Ã- 12' |
225 |
| Composting yard |
1 |
70' Ã- 40' Ã- 20' |
2400 |
| Pasteurization tunnel |
2 |
36' Ã- 9' Ã- 12' |
648 |
| Boiler/Generator room |
1 |
20' Ã- 12' Ã- 12' |
240 |
| Casing soil pasteurization |
1 |
15' Ã- 12' Ã- 12' |
180 |
| Mushroom Packing area |
1 |
15' Ã- 12' Ã- 12' |
180 |
| Spawning area/room |
1 |
20' Ã- 15' Ã- 12' |
240 |
| Total area |
|
|
1600 (sq.ft.) |
In addition to above, land would be required for casing soil dump, wheat straw and poultry manure storage and road paths, etc. Appropriate land required would be around 3500 sq.mts.
CONSTRUCTION AND INSULATION
Composting yard: Compost making by long and phase I of short method requires a covered shed without walls. The high roof and absence of walls will facilitate the escape of foul gas into the atmosphere. The composting yard should be laid on a firm ground. Bed of sand 15-20 cm thick is first laid, followed by a layer of concrete (15 cm thick). The floor must be well laid out and also allow smooth operation of door of bulk chamber. The floor is given a run off 1 cm per running meter away from the bulk chamber towards the guddy pit. The guddy pit should be 2 Ã- 2 Ã- 3m in dimension with a dewatering pump and a hose for spraying back the run off water on the composting material. The roof of the outdoor composting platform is built on tresses or RCC pillars 15' high with a Gl roofing.
The composting yard should be big enough to hold compost stack for phase I of composting and the size of the composting yard will be determined by the number and the capacity of bulk chambers. On an average, one tonne compost occupies about one metre length of the compost yard with extra space of 5m on each side for turning the composting material. A drain should run on two sides of platform away from the wall to facilitate periodic cleaning of platform.
PEAK HEATING CHAMBER/BULK CHAMBER/TUNNEL
Bulk chambers/tunnel is required for mass treatment of the compost. Location of the tunnel in the mushroom growing unit is very important. The following parameters will influence its location:
- The risk of infection
- Location relative to the growing rooms
- The ease of connection to the site services
- Transporting of compost
- The possibility of expansion.
After phase I the compost is shifted to peak heating chamber/ bulk chamber/tunnel for pasteurization. For this, an insulated chamber is built with the facility for steam inlet, blower and controlled fresh air entry. The purpose is cutting off the external environment and creating the controlled fermentation of composting ingredients. Two types of chambers are used. For single zone system where all the operations are done in one room, the rooms are very well insulated and provided with steam, air handling cooling and heating facilties. This system proves efficient in already built structure like cold storages, where the entire space is utilized maximum without investing in construction of bulk chamber. The single zone system is labour economic but it is costly, because the capital cost is higher as all the rooms will be equipped with the facilities for all the operations to be carried out in series. In two zone system, compost is prepared in separate chamber and growing is done in separate chamber.
The dimension of the bulk chamber depends on the quantity of the compost to be filled. The thickness of the beds of compost can vary according to the density which depends upon straw contents, straw hardness, quality of animal by products, moisture contents and degree of phase I composting. During peak heating about 25% of compost is lost during spawn running. The tunnel, therefore must be filled with 30% more of compost.
The floor of the bulk chamber is prepared just like the floor of composting yard i.e., the floor is first laid with a sand 15-20 cm thick, then spread a layer of broken brick/stone (rori) 10 cm thick, followed by 5 cm concrete floor (1:2:6) and insulation with thermocol/ glass wool 5 cm. thick (15 kg/m3 density) (Fig. 4).This will give K value of 0.5-0.6 K Cal/m2 °C/hour. The insulation is covered with isolating membrane of PVC sheeting followed by 5 cm. concrete floor and finally the finish. The outer brick wall should be 22.5 cm thick over the concrete foundation floor and walls are seperated to leave space for expansion of construction under extremes of temperatue. This is done by filling 1 cm broad polystyrene battens to the base of the walls before pouring the concrete. They are burnt away later and the space is then filled with bituminous sealant.
The bulk rooms have double floor. The lower floor consists of an insulated concrete layer lying about half a meter below the level. The second floor consists of wooden beams or concrete grates with opening in between. All the openings should cover about 25% of the floor space. For good pressure distribution and free flow of air without any restriction, lower concrete floor is given 2% slope down to the air inlet. In a tunnel of 20 tonnes capacity, the plenum should be 3' deep at upper end. The floor must be laid with a good run off provided with a drain to facilitate the cleaning. Since, the temperature in the tunnel goes up to 60°C, its walls ceiling and the floor below the plenum should be well insulated.
The base of the tunnel (below grated floor) is full width ventilation duct. The blower, steam outlet from the boiler and re-circulation duct are provided on the deeper side of the tunnel. The plenum is divided with a perforated brick wall (one or two) in the centre for supporting the grated floor. The grating can be made of wood (painted with bituminous paint), coated iron strips mounted on angle iron frame or cemented, if possible. If nylon nets are to be used for mechanical filling and emptying, then cemented grated floor with appropriate RCC strength is built specially for the purpose. The doors of the bulk chamber are made of angle iron in wooden frame with 2-3" insulation in the middle and covered on both sides with aluminium sheets. Two vents are provided at the top of the tunnel, one connected to the blower through a recirculating duct and another provided for the exchange of surplus gases and water vapour from the tunnel. Fresh air in the tunnel is introduced via recirculating duct through dampers which are generally located at the top of the tunnel. This fresh air is filtered through 2mm filters. The tunnel should be hermetically sealed, insulated room without any leakage. A rubber gasket is provided on the inner side of the doors to make it leakproof. The chamber is serviced by a blower fan below the plenum, installed in underground room or on side of the chamber. The blower fan size will be in accordance with the tonnage of the compost in the bulk chamber.
A centrifugal blower fan, energized by a 7.5 HP motor with speed of 1440 rpm. will be able to produce necessary air pressure of 100-110mm of water level at entry point. The steam line is also connected at the entry point near the blower. The bulk chamber may have one door for filling and emptying the compost or two doors for filling and other for emptying the compost.
Roof is constructed just like that of the composting yard.
INITIAL CONSIDERATION/WORK PLAN
An air flow of 15-200 m3/per ton of compost is essential for effective well controlled pasteurization and optimum yields. Height of the compost in the tunnel is usually kept 2.0-2.2 metres and at this height 1 ton of compost needs floor area of about 1.1-1.2 m2 or 900-1000 kg. compost per m2 floor area can be filled in the tunnel. About 20-25% of the weight of compost is lost during pasteurization and 7-10% during spawn run i.e., about 1/3 of the original weight of compost is lost upto spawn run. One can say, if 10 qtls. of compost is loaded in the tunnel after phase 1 only 7.2-7.5 qtls will be available after phase II and about 6.8 qtls remain after spawn run. For 200 m2 growing area with 90 kg of spawn run compost/m2 then a total of 18 tonnes of spawn run compost or about 20 tonnes of un spawned compost is required or about 27 tonnes of fresh compost at filling. For this, one should start the composting with approximately 10 tonnes dry weight of the base material.
Compost should not be tightly filled in bulk chamber, it will result in poor aeration and low productivity.
Most of the air being circulated inside the tunnel, is the air exhausted in the space above the compost and blown inside under the ground floor through a blower. Only little fresh air is drawn inside through filter.
For bulk chamber to run most effectively necessary infrastructural construction has to be of exact specification. Any deviation from optimum standard will have detrimental effect on yield. Boiler and blower have to be of exact specification. For a standard tunnel of 20-tonnes capacity (ready to spawn compost), boiler of 300 lb/sq. inch should be good enough for effective pasteurization and conditioning. Blower fan of 1460 rpm is required for effective circulation of air during processing, corresponding to air displacement of 200m3, provided the grated floor is having 25-35% air gap.
Growing Rooms: The growing rooms should be according to the capacity of tunnel to accommodate the compost. For 20 tonnes of compost, room size should be 35' Ã- 25' Ã- 12' and growing rooms should be in line on both the sides. The foundation of growing rooms can be put like that of tunnel. The ground is generally not insulated. The walls of the growing room should be built of one brick having 3-5 cm thickness of insulating material inside, followed by cement plastering. Ceiling is made of 4" thickness RCC. The walls and the ceiling of the rooms must be damp proof. All joints in corrugated panels must be sealed from the above and the whole upper surface of the ceiling must be damp proof. Bituminous products are suitable. There are also other commercial products based on synthetic polymers. The damp proofing material must be applied sufficiently thick, to give a vapour barrier of at least 115m thickness.
The damp proofing layer on the walls follows the same standard and either bitumen or white polymer paint may be used. In recent years white damp proofing paints have been used. Although they are expensive but gives pleasant working environment, better lighting, more hygiene. The surface must be smooth for better working.
The roof on the outside is protected by tarring it on top, followed by 10 cm thick loose soil, 5 cm thick mud capping and finally the tiles. This will protect the roof from weathering effects of rain and will ensure longer life of insulation and prevent seepage of moisture into the room in rainy season. In hilly areas with a high rain fall slanting Gl sheet roof will be excellent and in that case mud capping and tiling of the roof is not done.
Single insulated door is made up of GI sheets, or aluminium sheet. A rubber gasket is also provided in the door. Two vents (1.5"Ã-15") provided in the opposite walls 2-3' above ground level. The vents are closed with wire nets and provided with insulatedshutter for closing and opening. For change of air, a fresh air duct is provided on the top of the door made up of polythene sheets having small holes all over. This duct runs lenght wise in the room and is connected to the exhaust fan (24" diameter) energized by a 1.5 HP motor, mounted in a box, which is known as air handling equipment. This equipment has provision of cooling, heating and providing proper humidity in the rooms, and is installed in each growing room. The duct keeps the air movement within the room in permissible limit to prevent cracking of mushroom.
Ventilation System: Ventilation system can be: (a) under pressure system, (b) over pressure system. Under pressure system operating on 2 fans placed at two extractor openings, (40 x 40cm), present in the back wall. Two axial fans are fitted in these, each with capacity of 3000m3/h giving a combined capacity of 4500 m3/h in the cropping room after taking into consideration the resistance of spore filters at inlet openings. Single centrifugal fan for extraction can also be mounted in the opening above the door and in that case inlet openings are put at the sides and fitted with filters.
In overpressure system two outlet openings (40 cm Ã- 40 cm) at the back of the room should be made with main inlet opening in front, with an axial fan and filter.
The distribution ducting must be carefully mounted in the centre of the room, while care must be taken to ensure even distribution by using a fixed duct with outlet holes/grills along its length. If an axial fan is used, rotation of the air must be stopped by using a distribution plate or honey comb.
On building of positive pressure with forced air circulation fan, the CO2 laiden air will automatically be forced out of the back vents without allowing the entry of heat from outside to inside. When forced air circulation is not in use (during spawn run), the vents are to be closed with insulated panelled cover. During spawn run, the forced air circulation duct will work for cooling/heating of the air inside, with inner air recirculating in the room.
The important climatic factors in the growing room are; temperature, CO2, relative humidity and air speed which have a direct bearing on crop yields.The main emphasis has therefore, to be laid on providing the optimum conditions for various stages of growth in the cropping room i.e., vegetative growth and reproductive growth. For creating correct environmental conditions, the necessary infrastructure built has to be of the exact specification as mentioned above.
The growing rooms should have five shelves one above the other having wooden boards/GI sheets on all the four sides and bottom, keeping a distance of 60 cm each (Fig. 3). If cultivation is done in bags then four shelves can be installed, keeping minimum distance of 60-75 cm. each. Depth of compost in each bag should be 12-14", or in case of shelves 6-8". A room of standard size (35' Ã- 25' Ã- 12') can accommodate 3 rows of racks, each 5' wide. This will occupy 15' of the room land, the rest 10' can be used to have central paths of 3' each and two side paths of 2' each. Length of each rack would be 30'. In one growing room 20 tonnes of compost can be accommodated.
Seasonal Growing: Seasonal growing rooms are simple with some modifications. The growing rooms will have a cemented ceiling or a false ceiling with arrangement of forced air circulation (Fig. 5.)
The forced air circulation is very essential in seasonal growing houses by installing an exhaust fan on top of the door fixing inwards; joined to a perforated polythene duct running along the entire length of the room. The walls and false ceiling should be air tight to make the forced air circulation system effective and workable. In low cost growing houses where thatched roof or asbestos sheets are used, false polythene ceiling will be good enough to create the sealing effect on top. The seasonal growing houses should not be insulated, as it will be difficult to maintain the environment inside the room congenial for crop growth. In extreme areas where lower temperature are prevalent in some part of the season, brick walls with air gaps should be good enough to prevent condensation of water on the walls in the cropping room in winter months.
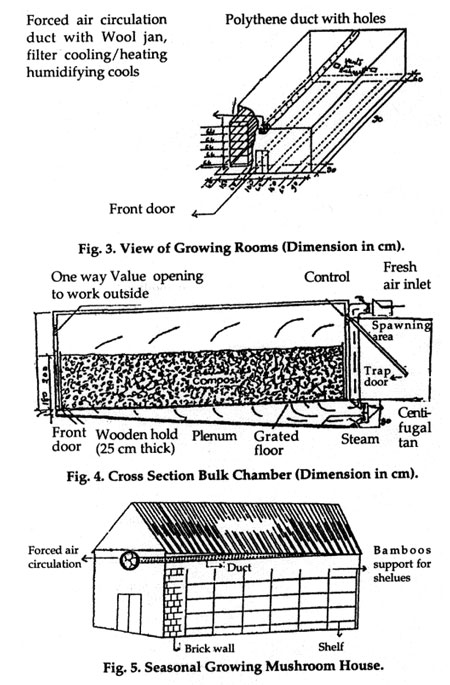
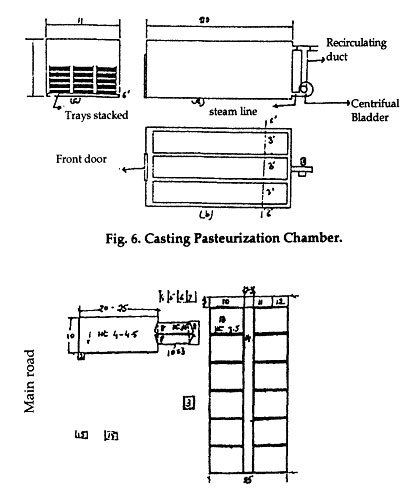
1. Out Door Composting Shed
2. Guddy Pit
3. Casing Pasteurizing Room
4. Boiler Room
5. Tool Room
6. Generator Room
7. Supervisor Room
8. Bulk Chambers
9. Spawning Area
10. AC Compressor Room
11. Packing Room
12. Office
13. Cropping Rooms
14. Corridor
15. Overhead Water Tanks

Air changes, cooling/heating, RH, heat/CO2 removal and evapouration from the beds is constantly maneuvered inside the cropping room for getting a healthy crop of mushrooms. All the above mentioned factors have to be maintained, in the co-ordinated manner as change in one factor affects the other.
CASING PASTEURIZATION CHAMBER
The casing pasteurizing chamber is an insulated chamber with a steam connection and a blower for effective circulation of steam inside the chamber, to achieve correct temperatures for pasteurization of the casing material. The size of the chamber depend upon the size of the compost chamber and the size of the growing rooms. One chamber load should provide casing for one compost lot from each tunnel. The casing after wetting is filled in the perforated wooden/aluminium trays which are placed one over the other inside the chamber. The door of the casing pasteurization chamber should also be insulated as in bulk chamber and made air-tight by fixing a rubber gasket on the inner boundary of the door. The casing chamber will also require the air handling equipment for cooling in summers. The chamber should be built away from the composting yard to maintain hygiene and cleanliness.
ECONOMICALLY VIABLE COMMERCIAL BUTTON MUSHROOM UNIT
To begin with, a commercially viable unit should have the under-mentioned facilities:
| SI. No. |
Facility |
Unit |
Size |
Total (sq.ft.) area |
Purpose |
| (i) |
Composting yard |
1 |
70' Ã- 40' Ã- 20' |
2800 |
Outdoor composting |
| (ii) |
Pasteurization chamber |
2 |
36' Ã- 9' Ã- 12' |
648 |
Pasteurization of compost |
| (iii) |
Casing pasteurization room |
1 |
15' Ã- 12' 12' |
180 |
Pasteurization of casing |
| (iv) |
Spawning room |
1 |
20' Ã- 12' Ã- 12' |
240 |
Spawning of compost |
| (v) |
Insulated cropping rooms |
12 |
35' Ã- 25' Ã- 12' |
10500 |
Growing of mushrooms |
| (vi) |
Boiler/generator room boiler |
1 |
20' Ã- 12' Ã- 12' |
240 |
Housing of boiler/generator |
| (vii) |
Air-conditioning unit |
1 |
15' Ã- 15' Ã- 12' |
225 |
House of A/C unit |
| (viii) |
Store room |
1 |
15' Ã- 12' Ã- 12' |
180 |
Storing of tools and implements, etc. |
| (ix) |
Office alongwith lavatory |
1 |
30' Ã- 12' Ã- 12' |
360 |
Staff/administrative purpose |
| (x) |
Mushroom packing area |
1 |
15' x 12' x 12' |
180 |
Packing of mushrooms |
| (xi) |
Water storage facility to be constructed over the roof |
- |
- |
- |
Supply of water |
| |
|
|
15493 sq.ft or 16000 sq.ft |
|
|
ECONOMICS
Fixed costs
| |
|
Rs. |
| A. |
Land-procurement and development |
8,50, 000.00 |
| B. |
Infrastructure facility |
|
| |
(i) Construction of one composting yard at Rs. 125/- sq.ft |
3,5,000.00 |
| |
(ii) Construction of pasteurization chamber inclusding insulation at Rs. 275/- sq.ft |
1,78,200.00 |
| |
(iii) Construction of pasteurization room at Rs. 200/- sq.ft |
49,500.00 |
| |
(iv) Construction of one underground service room at Rs. 200/- sq.ft |
25,600.00 |
| |
(v) Construction of spawning room/area |
48,000.00 |
| |
(vi) Construction of boiler/generator and store rooms at Rs. 200/- sq.ft |
84,000.00 |
| |
(vii) Costruction of over-head water tanks (25000 litres capacity) |
50,000.00 |
| |
(viii) Construction of cropping rooms (12) including insulation charges at Rs. 275/- sq.ft |
28,87,500.00 |
| |
(ix)Construction of A/C at Rs. 200/- sq.ft |
45,000.00 |
| |
(x) Office/staff room and store room at Rs. 200/- sq.ft |
72,000.00 |
| |
(xi) Mushroom packing room at Rs. 200/- sq.ft |
36,000.00 |
| |
|
Total : Rs. 38,25,800.00 |
| C. |
Machinery |
|
| |
(i) Central A/C facility consisting of one 100 tonnes capacity, compressor, chiller, condenser, air handing unit, etc. |
25,00,000.00 |
| |
(ii) Boiler 300 kg evapouration/h capacity |
2,50,000.00 |
| |
(iii) Generator 50 KVA capacity |
4,00,000.00 |
| |
(iv) Understack blowers |
30,000.00 |
| |
(v) Iron racks in the growing rooms and iron grating in the chamber |
4,50,000.00 |
| |
(vi) Compost turner, mixer and filling line |
1,75,000.00 |
| |
(vii) Electric and other installations |
1,50,000.00 |
| |
(viii) Miscellaneous equipment like sprayers, buckets, forks, harvesting knives, trays, rubber pipes, weighing machine, etc. |
1,00,000.00 |
| |
|
Total Rs. 40,55,000.00 |
| |
Total cost (land + building + machinery) |
Rs. 87,30,800.00 |
Variable Costs
| A. |
Raw materials and other operational expenses |
|
| |
(i) Wheat straw 400 tonnes at Rs. 1000 per tonne |
4,00,000.00 |
| |
(ii) Chicken manure 225 tonnes at Rs. 350 per tonne |
78,750.00 |
| |
(iii) Casing soil procurement and its treatment (450 m3 at Rs. 100/m3) |
45,000.00 |
| |
(iv) Spawn 18000 bags at Rs. 8 per bag |
1,44,000.00 |
| |
(v) Gypsum, urea, pesticides/insecticides, etc. |
50,000.00 |
| |
(vi) Electricity, fuel and water charges |
3,00,000.00 |
| |
(vii) Miscellaneous expenses |
12,000.00 |
| |
(viii) Risk factor at 4 per cent of the total raw material cost |
41,190.00 |
| |
|
Total Rs. 10,70,940.00 |
| B. |
Manpower requirement and wages |
|
| |
(i) One Manager at Rs. 6,000 per month |
72,000.00 |
| |
(ii) One Typist cum secretary at Rs. 3,500 per month |
42,000.00 |
| |
(iii) One Jr. Engineer to look after the machinery at Rs. 4,500 per month |
|
| |
(iv) Total mandays involved in compost preparation and spawning, 40 mandays/outing. Total 50 outings in a year and wages involved at Rs. 30/- day |
60,000.00 |
| |
(v) Labour requirement in the production unit at 70 man days/ crop cycle/room i.e. 50 crop cycles at 100% capacity utilization (total 3500 man days at Rs. 30/- day) |
1,05,000.00 |
| |
|
Total : 3,33,000.00 |
| C. |
Interest and Depreciation |
|
|
| |
|
Cost |
Interest + Depreciation |
| |
(i) On buildings |
|
10,70,940.00 |
| |
2.5% depreciation and 12% interest |
38,25,800.00 |
5,54,741.00 |
| |
(ii) On land (opportunity cost) |
|
|
| |
10% interest and no depreciation |
8,50,000,00 |
85,000.00 |
| |
(iii) On machinery |
|
|
| |
10% depreciation and 12% interest |
40,55,000.00 |
8,92,100.00 |
| |
Total cost (i + ii + iii) |
|
15,31,841.00 |
| D. |
Cost of Production and Return per Annum |
|
| |
(i) Raw materials |
10,70,940.00 |
| |
(ii) Wages and salary |
3,33,000.00 |
| |
(iii) Interest and depreciation |
15,31,841.00 |
| |
|
Total 29,35,781.00 |
| |
Total production at 100% capacity utilization at 18% conversion taking 4 crops of 90 days (15 days for spawning, 15 days for casing + 4 days for promordial initiation/development + 8 weeks picking) during each crop |
144 tonnes of fresh mushrooms per year |
| |
Cost of production per kg fresh mushroom |
20.31 or say Rs. 20 |
| |
Income from sale of mushrooms at Rs. 30 per kg |
43,20,000.00 |
| |
Net profit per year. |
13,84,219.00 |
Economics of Canned Product
| |
(i) Cost of A-10 can |
Rs. 25.00 |
| |
(ii) Cost of canning and brine solution |
Rs. 5.00 |
| |
(iii) Cost of mushroom 2 kg/drained weight, 3 kg fresh mushrooms at Rs. 25 per kg |
Rs. 75.00 |
| |
|
Rs. 105.00 |
| |
Sale price of one case containing 66 A-10 cans |
$ 28.00/case |
| |
|
$ = Rs. 32 or say |
| |
|
Rs. 896/case |
| |
Total cans produced from 95 tonnes of mushrooms |
7917 cases or |
| |
(95000 kg mushroom = 47500 cans) |
47500 cans |
| |
Sale price of 7917 cases at Rs. 896 per case |
70,93,632.00 |
| |
Cost of canning one A-10 can |
105.00 |
| |
Cost of one case of 6 cans |
630.00 |
| |
Total production cost of 7917 cases |
49,87,710.00 |
| |
Net profit |
21,05,922.00 |
Economics of agaricus bisporus cultivation in northern plains with compost prepared by long method (based on information given by growers of Hisar/Sonepat) Jandaik, 1995
| A. |
Fixed Costs |
Rs. |
| |
(i) Land already available with the grower |
|
| |
(ii) Cost of construction of thatched house/mud house (25 Ã- 6.3 M) |
10,000.00 |
| |
(iii) Cost of racks made from bamboo and/or sticks |
5,000.00 |
| |
(iv) Cost of spray pump, thermometer, forks, etc. |
2,500.00 |
| |
|
Total : 17,500.00 |
| B. |
Variable Costs |
|
| |
(i) Wheat straw 40 quintals at Rs. 100/- quintal |
4,000.00 |
| |
(ii) Poultry manure 1000 kg at Rs. 12 per quintal |
120.00 |
| |
(iii) Fertilizers |
|
| |
(a) Calcium ammonium nitrate 50 kg at Rs. 2 per kg |
100.00 |
| |
(b) Urea 30 kg at Rs. 3 per kg |
90.00 |
| |
(c) Superphosphate and potash (20 kg each) at Rs. 1.5 per kg) |
60.00 |
| |
(iv) Molasses or wheat bran |
350.00 |
| |
(v) Insecticide/fungicide, etc. |
200.00 |
| |
(vi) Spawn 200 bottles (300 g in each bottle) at Rs. 8/- bottle |
1,600.00 |
| |
(vii) Casing soil treatment charges |
300.00 |
| |
(viii) Two labourers for 4 months at Rs. 30/- day |
7,200.00 |
| |
(ix) 30 mandays for different turning of compost and fitting/spawing |
900.00 |
| |
(x) Miscellaneous expenses |
1,000.00 |
| |
|
Total : 15,920.00 |
| C. |
Depreciation and interest |
|
| |
Depreciation on A at 5% for kucha/mud structure and interest at 112% for 4 months |
922.00 |
| |
Total expenditure (B + C) |
16,912.00 |
| |
Anticipated yield at 10% conversion of compost |
1200 kg |
| |
Cost of production per kg |
14.00 |
| |
Income from sale at Rs. 30/- kg. |
36,000.00 |
| |
Net income in 4 months |
19,088.00 |
Economics of white button mushroom cultivation in hills with pasteurised compost (information given by a local grower at Solan)
| A. |
Fixed Costs |
Rs. |
| |
(i) Land already available with the grower |
|
| |
(ii) Cost of construction of compost pasteurization tunnel (12 tonnes capacity) |
55,000.00 |
| |
(iii) Cost of boiler (coal/diesel) and pipe fittings |
60,000.00 |
| |
(iv) Blower and motor |
18,000.00 |
| |
(v) (35' Ã- 16' Ã- 10') without insulation |
1,10,000.00 |
| |
(vi) Cost of iron shelves (3 tiers) |
40,000.00 |
| |
(vii) Cost of spray pump, forks, thermometer, etc. |
2,000.00 |
| |
|
Total : 2,85,000.00 |
| B. |
Variable Costs |
|
| |
(i) Wheat straw 90 quintals at Rs. 100/q |
9,000.00 |
| |
(ii) Poultry manure 45 quintals at Rs. 12/q |
540.00 |
| |
(iii) Wheat bran 9 quintals at Rs. 320/q |
2,880.00 |
| |
(iv) Urea 135 kg at Rs. 285/q |
385.00 |
| |
(v) Gypsum 3 quintal |
300.00 |
| |
(vi) Spawn 400 bags (purchased from University Spawn Lab.) at Rs. 8/- bag |
3,200.00 |
| |
(vii) Polythene bags 55 kg. at Rs. 65/- kg. |
3,575.00 |
| |
(viii) Labourers two for 4 months at Rs. 30/- day |
7,200.00 |
| |
(ix) Additional labour (50 mandays) for turning of compost, filling and spawning |
1,500.00 |
| |
(x) Fuel charges for pasteurization of compost and casing materials |
3,000.00 |
| |
(xi) Electricity and water charges |
1,800.00 |
| |
(xii) Insecticide, fungicide, etc. |
2,000.00 |
| |
(xiii) Miscellaneous charges including marketing expenses |
4,450.00 |
| |
|
Total : 40,740.00 |
| C. |
Depreciation and Interest |
|
| |
Depreciation at 2.5% on building and 5% on machinery and interest at 12% on A |
14,775.00 |
| |
Total expenses (B + C) |
55,515.00 |
| |
Anticipated yield at 18% conversion of spawned compost |
3,240 kg mushroom |
| |
Cost of production per kg. mushroom |
Rs. 16.8 or say |
| |
|
Rs. 17.00 |
| |
income from sale at Rs. 30/kg |
97,200.00 |
| |
Net profit in 4 months |
41,685.00 |
